How to Make Giant Peony Paper Flowers!
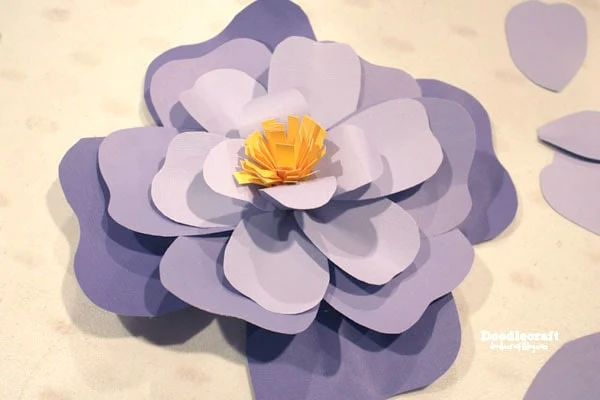
I love paper crafts. Paper is very economical and a great way to make a big statement. These finished flowers are big, a foot in diameter! They are bright colored and very easy to make...and the best part is they only require 3 supplies.
Make giant paper peonies for the perfect party backdrop, home or seasonal decor, giant bouquet of flowers or bedroom decoration. This budget friendly craft is a must try!
These are beautiful! They make a great photo or party backdrop! They are gorgeous as decorations! They would also be perfection as a big bouquet for a loved one for the perfect handmade gift.
Paper is the best budget craft supply. Pick up a pack of cardstock at the craft store, online or big box store and get to work creating beautiful blooms for Spring time.
***If you are tight on a crafting budget, paper crafting is the best place to start.***
Did you know that I am allergic to flowers? It's true. Totally allergic. My symptoms from smells that I am allergic to, come on like the flu; body aches, headache, exhaustion...so it usually takes me a few days to realize it's just from allergies and that I'm not getting sick. So inconvenient!
Paper flowers are my solution for the beautiful presence of flowers without the allergies. You'll find a lot of paper flower varieties on my blog...search "paper flowers" in the search bar if you don't believe me!
Supplies Needed for Giant Peony Paper Flowers:
Hot glue/gun (here's a great full size option)
Step 1: Cut Flower Parts
I did these with my daughter and my 2 adorable nieces. I just drew out random teeth/heart shapes and told the girls to cut them out.
I used 3 sheets of 12 by 12 paper for each flower petals. All graduating in color.
I had this fun team of girls help cut all the flower pieces out. Put on a movie or some fun music and enlist some tweens to help cut the paper petals.
It's easy to stack a pile of papers together and cut a bunch of them out at the same time. Don't be too worried about the petal shape. They are asymmetrical, natural and imperfect.
I used 4 large petals, 6-8 medium petals, 6-8 small petals and 4 tear drop shaped petals. One round piece for the backing...about 8 inches wide. Plus a long strip of yellow for the center.
Step 2:Yellow Flower Center
Next, cut the yellow strip of paper to have a fringe edge. Cut even slits, but not all the through the paper.
Then roll up the yellow strip and hot glue it in a tight roll. Hot glue a little bit as you go, so it doesn't unroll, and it stays pretty tight.
Finally, curl the yellow fringes out to add fullness to the flower center.
Step 3: Build Petal Base
Crinkle the flower petals at the smaller end and hot glue them one by one onto the circle paper. Begin by putting the 4 largest petals on the circle, as close to the outside edge as possible.
Then use the next biggest sized petals and layer those 6 around the circle.
Repeat with the next 6 biggest petals. Crinkle and then hot glue in place, overlapping slightly as necessary.
Then glue the 4 final smallest tear-drop shaped petals around the yellow fringe flower center.
Step 4: Finish Flower
Then add hot glue to the backside of the yellow center and the tear-drop petals and squeeze it right in the center of the layers of paper petals.
Step 5: Repeat!
Now make lots more flowers! Experiment with the shapes of petals, the fullness or the colors! Add leaves, ferns or whatever your creativity brings you to make unique blooms for Spring decorations, party backdrops, bedroom decor or big bouquets!
I love the graduating ombre colors of these flowers, they are just magic!
They are easy to hang up by just hot gluing a little loop of pipecleaner to the backside and a command hook on the wall. More details for hanging flowers on this post.
I absolutely love decorating with paper--and you will too!
Like, Save, Share, Comment, Follow and Pin!
Here's some more great paper flowers!


-min.jpg)


Comments
They are GORGEOUS!