DIY: Make a Calligraphy Oblique Holder!
Learn how to make an oblique calligraphy pen holder. This is the ultimate writing utensil for calligraphers. It's an interesting pen that holds the nib at the right angle with ease in the hand. Make a custom one for a left handed calligrapher, a handmade gift or just to add to your collection of gorgeous pens.
I am writing up this post because I feel like this is the post I've was searching for.
I have been searching and scouring sources to find a comprehensive guide to making my own oblique holder...and pretty much came up empty handed.
There are a few points here and there...so I made some holders and am going to teach you what I learned.
Oblique holders are so elegant and beautiful to write with and look at.
There is something so fun about the angled flange and the wonder
of onlookers about how to write with it!
Oblique holders range in price from super dirt cheap for a plastic holder
If you do calligraphy for long, you will find yourself wanting a really pretty and unique holder.
So let's make some.
With all the supplies involved it's easy to see why they are worth so
much--because of the big investment just to get started!
Supplies Needed for Calligraphy Pen Holder DIY:
Scissors, sharpie, ruler,
Wood
Some I just whittled from sticks we found...
Others I turned on our Wood Lathe
These Nikko G nibs are a great nib for beginners.
This will help to coat it against water or ink stains.
Let's get started.
First you will need to measure and cut your brass.
I measure the entire sheet of brass, 1/2 inch by 2 inches.
Then I just used cheap dollar store scissors that I'm not attached to and cut the brass strips.
I started by using tin snips, but they leave a jagged edge and are hard to control,
normal scissors are perfect for cutting this thin brass.
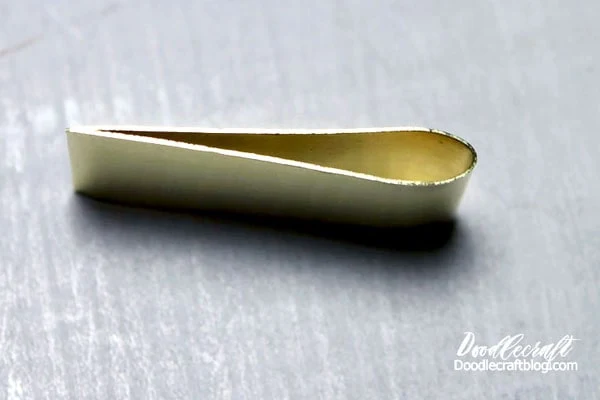
Next I used my fingers to gently fold the brass strip in half.
Next we will use the bail pliers and gently pinch the end where it is folded.
This makes it very flat.
Then curl the brass around the smaller size, the 3mm rod.
Then take it and fit the 5mm rod into the curve.
I made 72 of these and this was the best way to ensure the proper size.
Now it looks similar to this.
There is a slight gap between the top and bottom layer of brass,
this is perfect for the nib to slip inside and hold tight.
Fit the nib in gently and then hold with the pliers and bend the remaining
brass out to the side of the nib.
In this shape.
Trim the edge of the brass at this point so they line up nicely.
And then make 72 of them!
I made them all in one night, while watching Poldark.
I just have them in a jar for whenever I feel like making a new oblique.
Next, fitting them into the wood pen.
I used fine grit sandpaper to really sand the wood sticks.
They are all smooth and silky.
You will need the hobby saw at this point.
Gently use the saw to cut a groove in the side of the wood at an angle.
If you are right handed, the groove goes in on the left side...and vice versa.
Then the flange is just pushed inside the groove.
The groove may need to be made a little bigger, deeper or adjusted as you go.
Each piece of wood is different, so this part requires some artistic ability and flexibility.
Now you just repeat the process for as many pen holders as you want!
When inserting the nib, the tip should line up with the center line of the holder.
So this funky wide piece of wood is just a statement piece.
Now, you will want to glue in the flanges with the CA glue
and coat your wood holders with lacquer.
Or you can stain, paint and decorate them to your hearts content!!!
I love the natural wood and the knots and grain!
Of course, I'll do a bunch more and paint them and jazz them up too!
Since I've started doing Calligraphy more,
I'm super obsessed with new oblique holders and all the gorgeousness!
I hope you appreciate this post and it inspires you to make an oblique holder!!!
Like, Pin and Share!


-min.jpg)


Comments
This is an awesome post about a great idea! Loved it. If you happen to make any other kinds of calligraphy pens, I'd look forward to a post from you. Keep up the great work!