Affiliate links included. All opinions and ideas are my own.
Resin Unicorn Horn Calligraphy Pens DIY
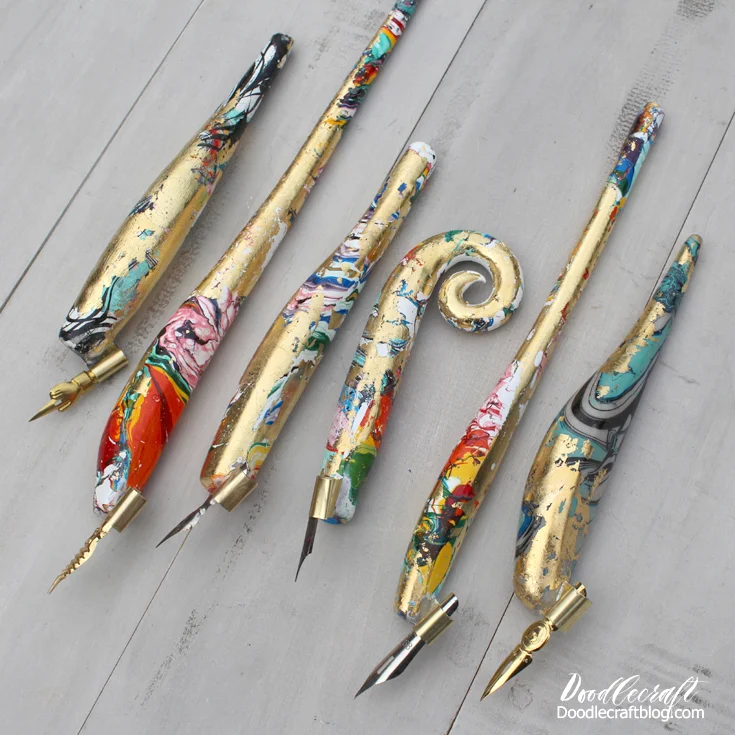
Unicorns are absolutely the best--and this week I am spotlighting all things unicorn. These unicorn horn calligraphy oblique pens are made with EasySculpt resin clay. EasySculpt is a 2 part clay that is mixed together to activate. It dries off white with a smooth porcelain finish. These horns are magical looking and write very well! Great handmade gift for a calligrapher!
Have you use a calligraphy pen like this? These ones are made for a right handed user. The angle of the nib makes the tip line up naturally when writing...for optimal angled writing. I prefer an oblique holder to a straight holder any day. Plus, they look so cool and unique!
You will need:
Easy Sculpt Epoxy Modeling Clay
Gold Leaf and Adhesive
Silver Glitter paint
Brass Nib Holders (read this post for how to make them and all the details)
Precision Saw
Calligraphy Nibs
CA (Cyanoacrylate) Glue
Let's get started!
Begin by reading through the instructions for the EasySculpt clay. The clay comes in 2 jars and needs to be mixed thoroughly to activate. It becomes incredible sticky--but becomes more pliable and usable after some time.
Mix one part of each jar together until there is no marbling. Wear gloves, this stuff is sticky! Let it sit on a piece of wax paper or some non stick surface for at least 20 minutes.
After 20-30 minutes, break the clay into pieces and roll them into individual unicorn horns. Let them dry on a non stick surface.
Add a twist by rolling a long and thin snake and twisting it around a horn.
Roll them on their sides periodically to prevent them from sagging.
Let them cure overnight.
EasySculpt resin dries super hard and porcelain-like. Then spray paint them or paint them with glittery paint.
Now you will need a precision saw and the flanges.
Use the saw to saw a angled groove into the resin. This resin dries incredibly hard, so use caution...I totally slipped and cut my finger doing this. 😔
The slit should only go to about half the diameter of the top of the horn. Then the flange can be pushed into the slit.

The angle should be so that when the nib is inserted in the flange that the tip of the nib lines up with the center line of the oblique pen holder.
Stand the unicorn horns in a cup and add a tiny drop of CA glue (super intense super glue--warning: do not touch, keep away from kids, etc etc etc.) Or just use super glue. This glue is very thin, so it seeps into the slit and holds the flange in place.
The glue takes just a minute to dry hard.

Next, add some extra shine to the horns with gold leaf! Use a paintbrush to paint the adhesive on the horns. Let the adhesive dry until it looks dull, not shiny.
Then roll the horns on a piece of gold leaf and let the goodness stick to the adhesive. Dust away the excess gold leaf with a stiff brush.
That's it! They are ready to test out!
Just slip a nib in the flange and they are ready to write with.
Now dip the nib into some ink, gouache or watercolors and write on paper. Press down harder for down strokes and light pressure for up strokes creating the dramatic difference that gives calligraphy it's trade mark look.
The pens are comfortable to hold and fun to feel so magical!
This is a fun way to start making your own calligraphy pens, great for gifts or selling to other artists!
EasySculpt resin is amazing!
Like, Save, Share and Pin!
Check out these
EasySculpt Calligraphy pens too!
And for more fun things to make with EasySculpt!
Maui's Hook Necklace


-min.jpg)


Comments