How to Make DIY Resin Lucite Grapes (Retro Craft)
Learn how to make DIY Resin Grape clusters, an awesome throwback retro craft!
This fun craft is an intermediate resin craft, perfect for someone that has used deep pour resin before or is willing to give it a try!
Making resin grape clusters is a fun Spring home decor item, great for a centerpiece or in the knick-knack cabinet.
This retro craft is sure to get attention and conversation sitting on the coffee table!
What are Lucite Grapes?
Are you familiar with Resin Grapes?
In the 50's this is what the women liked making, especially Mormon women (members of the church of Jesus Christ of Latter-day Saints) in the United States...it's fun to see bunches of grapes in older ladies homes.
Commonly they are called Lucite grapes, Lucite is a brand name for polymethyl methacrylate, which is a type of resin or clear acrylic.
I decided it was the perfect vintage craft to revive and make a bunch for myself.
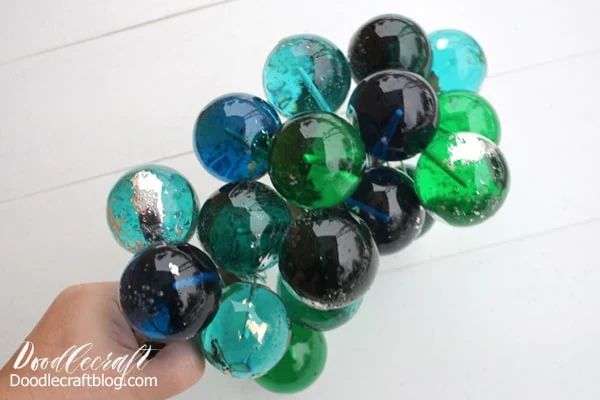
My mother in law has a set of purple resin grapes, but I decided to go with shades of blue and green. I'm obsessed with blue.
If you can't already tell!
Supplies Needed for Resin Lucite Grapes:
- EasyCast Resin (or Deep Casting Resin)
- 18 Glass Ornaments (preferably clear and thrifted)
- Blue and Green Translucent Dye
- Mixing Cups, Stirring Sticks, Disposable Gloves
- 16 Gauge soft Wire
- 12 inch Tree Branch or Stick
- Wire Flush Cutters
- Egg Carton
- Drill bit to fit the wire and Drill
STEP 1: Ornament Prep
Essentially, the ornaments are the mold for the resin grapes.
You will need ornaments that break, that are made of glass.
There's probably a silicone mold that would work for spheres too, but this was the most authentic way I could find to make these grape clusters.
Begin by pulling the ornament hardware out of the ornaments.
Place the glass ornaments with the openings up in the egg carton tray.
I used ornaments that have a metallic leafing inside the glass…so when I peeled my glass off, some of the silver leafing stayed behind, which is kind of a cool effect, but using clear glass would eliminate this.
Step 2: Mixing RESIN
Prep the ornaments by spraying one spritz of mold release inside each ornament and work it around the inside.
Fill one ornament with water and pour it out into a measured cup…that will let you know how much liquid each ball holds.
Mine were just over 1 ounce each.
I mixed up about 6 ounces of deep casting resin at a time so I could mix a variety of colors.
Mix the deep casting resin according to the package directions.
1 part of resin and 1 part of the hardener, mix gently for 2 minutes.
Then pour the mixed resin into a second cup and use a new stick to stir for 1 more minute.
Next, add a few drops of green and one or 2 of blue--or the color of your choice for juicy grapes!
I did some mixes darker and some lighter…some more green and some more blue.
The variety of the colors in my bunch of grapes is surprisingly pleasing.
Mix the color in thoroughly before pouring.
Step 3: Pouring Resin
After mixing, carefully pour the resin into each ornament.
Then pour slowly and try to get the resin all the way full in the ball but not in the neck part…or it will take the grinder to remove them later.
Continue filling the ornaments with colored resin in the same fashion.
Then let them sit undisturbed for 24 hours.
I mixed resin several times to fill all 18 ornaments, using nearly all the 32 ounce box.
Step 4: Breaking Ornaments
The next day clank 2 ornaments together deep inside a box or the trash can.
Again: wear gloves, some eye protection and work outside or in a garage.
The glass these ornaments will shatter into shards as pictured below.
By hitting the ornaments into themselves, they break and the glass peels off significantly easier.
Although, I had a few tough spots that I had to scrape with a small spatula.
Then clean them all in warm, soapy water.
See how much silver leafing stayed behind as a result?
Regardless, I did not know this would happen until I tried it…but I love the effect too!
Step 5: Add Wires
Next, I sent my son out to the garage to sand off the nubs and drill a 1 inch hole in each ball for 6 inches of wire.
Then push in some wire and then add a couple drops of super glue.
***NOTE: YES, you can absolutely insert the wires into the ornaments while the resin is setting. I'd wait until it gels up a bit and then use some painters tape to balance the wire in the resin so it doesn't go all the way to the base of the ornament.
I decided to set them aside and go to sleep, leaving some drilling for the next day.
Step 6: Branch Preparation
Now drill holes about 1/2-1 inch apart in the tree branch or medium sized stick.
You know, a great stick to play fetch with doggy.
I just found this in my yard, if a stick is unavailable, you could use a 3/4 inch dowel.
Step 7: Fill Branch with Resin Grapes
Then push a wire through the hole and wrap the remaining wire tightly around the branch.
Now, drill holes as needed and keep adding resin grape balls.
Ultimately, tuck the wire around the grapes as you work, the wires look like grape vines and can have little curls added to the ends as well.
Next, fill in gaps too by adding colorful resin balls, alternating the colors as you go--rainbow grapes would be so cute.
Keep the resin grapes as close to the stick as possible at the end and gradually further away as you work your way up…giving it an obviously distinct tapered grape cluster look.
The range of colors is uniquely stunning–I love the bright pops of aqua!
Awesome, right?! It's like a time machine taking you back to the 1950's!
I love reviving fun vintage crafts, no wonder all those Christian women in the good old days were making Lucite grapes for craft nights!
That's it!
Other Lucite Grape Questions Answered:
Check out these other fun resin crafts too!
Marbled Polymer Clay Earrings
How to Make Marbled Polymer Clay Earrings!
Learn how fun and simple it is to make marbled polymer clay earrings!
Polymer clay bakes is soft to work with and bakes hard in the oven.
Marbling the clay makes gorgeous quartz crystal effects, paired with gold leaf for the ultimate classy earrings.
Miniature Guitar Studio
Small objects made with a laser cutter are awesome when coated with some high gloss clear resin.
How to Make a Miniature Acoustic Guitar Studio! This miniature guitar studio is one of my most favorite projects to date. I love how this tiny little acoustic guitar turned out.
I love that mini hairpin leg stool. Learn how to make a miniature acoustic guitar and potted plants for the miniature lover in your life!
Glitter Resin Tumblers
Using glitter in all shapes and sizes is the perfect way to decorate a boring blank tumbler.
You'll want t cup spinner for this craft, but it's one of the great beginner resin projects!
How to Make Glitter Resin Tumblers!
Learn how easy and fun it is to make glitter resin tumblers.
These tumblers are super sparkly with a variety of glitter colors and sizes!
Customize these tumbler for any occasion! Wedding party color scheme, Graduation gift school colors, or just a favorite color!
Glitter Keychains
How to Make Glitter Resin Keychains!
Make gorgeous glitter resin keychains with power words as the perfect handmade gift. These glitter keychains are a great resin craft for beginners.
Learn to make glitter resin keychains with power words using EasyCast Resin, letter beads, tassels and keychain hardware.
Small items made with pour resin and glitter is an easy way to make a statement without too much work!
I Spy Game Trinket Tray
This I spy game resin serving tray filled with miniatures and trinkets is a fun DIY and would make a great gift!
Fill the tray with little things from the junk drawer or little heirlooms that sit in a jewelry box collecting dust. (Or you can buy a bunch of miniatures at craft stores)
With a thick layer of glossy resin--done in several thin layers, the trinkets stay in place and offer a smooth surface for using the tray for serving or a coffee table catch all.
Acrylic Paint Poured Pendant
How to make a resin pendant with paint pour skins leftovers from dirty paint pours.
This is a great way to make craft gold gold with otherwise useless pieces from another project!
Geode Resin Pour
How to make a geode resin pour canvas with glitter!
Making art projects for home decorations is a great option for resin crafting.

Resin Faux Quartz Crystals
How to make faux quartz crystals using easycast resin!
Create beautiful items with a clear deep pour type of resin, that sparkle in the sunlight just like the real thing!
No Tumbler Polished Rocks
How to make polished shiny rocks without a rock tumbler using high gloss resin spray!
For best results, spray in warm temperature...but not hot or cold temperatures.
Resin Vintage Frame Art Magnets
How to make mini vintage works of epoxy resin crafts art!
Casting vintage frames out of Fast Cast resin and printing famous works of art, then coating them with high gloss resin for the perfect fridge artwork.


-min.jpg)
-min.jpg)
-min.jpg)


-min.JPG)

-min.jpg)
-min.JPG)


-min.jpg)


Comments