Handmade Flower Cards with Waffle Flower Stamps
Handmade cards are so fun to make and these stunning floral cards look so fabulous. I am in love with flower stamps and love making floral themed cards. Make a stack of floral cards to have on hand for happy mail, sympathy cards, get well soon cards, birthday, anniversary or wedding cards. These flower cards can cover all occasions.
In September of 2009, I had emergency surgery for a tubal pregnancy that I was unaware of. My sweet friend brought me a handmade card during my recovery with some chocolates. Instantly, I fell in love with her handmade card and asked her to teach me.
We formed a card making group and my love has grown since then. I still love making cards. It’s my favorite papercraft. This is also when I discovered my love of Tombow Adhesives!
Supplies Needed for Magnolia Flower Cards:
Blush paper cardstock (cut in half and folded in half)
Black cardstock cut to 3 7/8 X 5 1/8″
White cardstock cut to 4 X 5.25″
White cardstock for mounted flower
Tombow ABT Pro Alcohol Ink Markers (colors used: P192, P158, P800, P850 and P761)
Die cutting machine
Black ink pad
Acrylic block for stamping
Craft foam piece
Step 1: Stamping the Base of the Floral Card
Begin by placing some craft foam on your workspace. Photopolymer stamps are wonderful but don’t have that layer of foam like a red rubber stamp. Placing foam beneath the paper is the best way to ensure a clean stamped impression.
Ink up the image with black ink and press onto the white cardstock.
Don’t rock the stamp from side to side. Just press down firmly and lift straight up. Place a piece of lightweight paper under the cardstock for the ink that runs off the paper.
Step 2: Mounted Flower
Stamp the smaller flower on a separate paper using the same process as above.
Then, use the die cutting machine to cut the smaller flower out perfectly. You can use scissors, but I love the ease of using dies. The die package comes with dies for every image included in the stamp set…so it’s pretty handy.
Step 3: Coloring the Florals
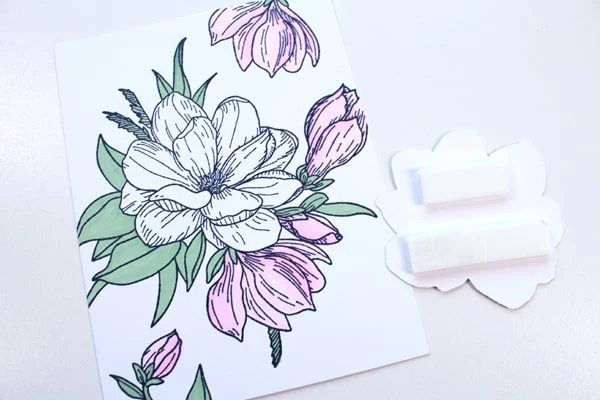
Use the ABT PRO Alcohol-Based Markers to color the images. I chose light pink flowers. Color over the entire flower with the lightest pink. Then, add shadows with the darker pink. Color the inside of the flower with the orange.
Color the background flowers as well. No need to color the main flower. Use the same technique with the green markers.
Step 4: Assemble the Floral Card
Now, turn the small flower over and apply some Tombow Foam Tape to the backside of it. Then, place the flower directly over the flower on the base card.
Repeat the process for a few cards. I love making a bunch of cards at a time to keep on hand…you never know when your friend will have emergency surgery and you’ll need a card.
Now, use the Tombow MONO Adhesive + Permanent to adhere the white cardstock to the black cardstock.
Just a tiny 1/8″ border of the black cardstock adds so much to frame it in. Then, adhere the black cardstock to the folded blush card.
Leave just a small border of the blush. This floral card is gorgeous because of these beautiful flowers! The floral card is simple enough to send through the mail too.
Make a fun floral envelope to match using this envelope making tutorial. Then, it’s ready to send. Imagine how excited the recipient will be. They will surely display this card on the mantel as part of their home decor.
That's it!
Like, Pin and Share!


-min.jpg)


Comments