How to Tie Dye Face Masks with Tulip Soda Ash Kit


This post may contain affiliate links, sponsored content and products received at no cost.
6:00 AM

How to Tie Dye Face Masks with Tulip Soda Ash Kit

How to Tie Dye Face Masks with Tulip Soda Ash Kit

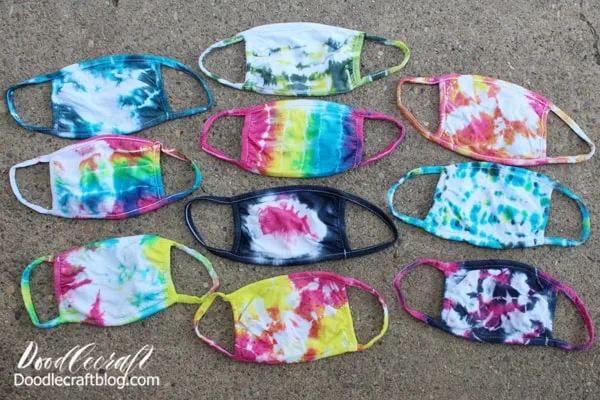
Masks are the new black! I have 5 masks in my purse all the time now. It's a new way of life that I'm adjusting to. Chances are high that you've got a bunch of masks too. Go back to school in style with these trendy tie dye face masks. 

Masks are the new black! I have 5 masks in my purse all the time now. It's a new way of life that I'm adjusting to. Chances are high that you've got a bunch of masks too. Go back to school in style with these trendy tie dye face masks.

Get your teenagers involved in this fun craft to get them ready for another school year. My daughter and I had a fun time tie dying together and this Tulip Tie Dye Kit using Soda Ash is super simple to use.

Get your teenagers involved in this fun craft to get them ready for another school year. My daughter and I had a fun time tie dying together and this Tulip Tie Dye Kit using Soda Ash is super simple to use.
Everything you need for these face masks at Oriental Trading!

Supplies Needed for Tie Dye Face Masks:

Baking/Cooling Rack (mine's for crafts only)
Plastic Grocery Bags
Zip Ties
Disposable Gloves 
(one set of gloves and rubber bands are included in the kit)

Supplies Needed for Tie Dye Face Masks: Tulip Soda Ash Tie-Dye Kit  100% Cotton Face Masks  Baking/Cooling Rack (mine's for crafts only)  Plastic Grocery Bags  Zip Ties  Disposable Gloves   (one set of gloves and rubber bands are included in the kit)

Here's a full video of tie dying masks:


Step 1: Soda Ash Bath

Read the directions for the tie dye carefully. Then fill a bucket with one gallon of water. Dump the soda ash packet into the water and stir until dissolved. 

Step 1: Soda Ash Bath Read the directions for the tie dye carefully. Then fill a bucket with one gallon of water. Dump the soda ash packet into the water and stir until dissolved.

Then place the ten face masks in the soda ash bath and let them sit for 20 minutes. The soda ash makes the dye a brighter and more vibrant finish.
In the meantime, mix up the dyes with warm water. Shake them for one full minute and then let them sit for 15 minutes. Shake again before using.

Then place the ten face masks in the soda ash bath and let them sit for 20 minutes. The soda ash makes the dye a brighter and more vibrant finish.  In the meantime, mix up the dyes with warm water. Shake them for one full minute and then let them sit for 15 minutes. Shake again before using.

Step 2: Wrapping Masks

After the masks sit for twenty minutes, pull out a mask and ring it out. Then twist, tie and wrap it up. Use rubber bands or zip ties to hold it tightly.

Step 2: Wrapping Masks After the masks sit for twenty minutes, pull out a mask and ring it out. Then twist, tie and wrap it up. Use rubber bands or zip ties to hold it tightly.

Step 3: Dye Time!

Now drip the dyes on the damp mask. Turn it over and dye in the same colors as the other side.

Step 3: Dye Time! Now drip the dyes on the damp mask. Turn it over and dye in the same colors as the other side.

Repeat this fun process for all 10 masks. I had enough dye to do all 10 masks, 3 large shirts and 2 baby onesies...so be prepared!

Repeat this fun process for all 10 masks. I had enough dye to do all 10 masks, 3 large shirts and 2 baby onesies...so be prepared!

After adding all the color, wrap up the masks in a plastic bag and set it in a sunny spot outside for 6-8 hours.

After adding all the color, wrap up the masks in a plastic bag and set it in a sunny spot outside for 6-8 hours.

Get creative in your zip tie binding and make fun patterns and colors.

Get creative in your zip tie binding and make fun patterns and colors.

The colors blend together where they touch, so you can achieve the whole rainbow spectrum with just these 3 colors.

The colors blend together where they touch, so you can achieve the whole rainbow spectrum with just these 3 colors.

Again, after you are done with the color, wrap them up in a plastic grocery bag and let them sit in the sunshine for 6-8 hours. 

Again, after you are done with the color, wrap them up in a plastic grocery bag and let them sit in the sunshine for 6-8 hours.

Then remove them and spray them off with the hose to remove any excess dye. Carefully clip off the rubber bands and zip ties and continue spraying them until the water runs clear. This can be done inside in the sink, but outside is so much more fun. 

Then remove them and spray them off with the hose to remove any excess dye. Carefully clip off the rubber bands and zip ties and continue spraying them until the water runs clear. This can be done inside in the sink, but outside is so much more fun.

Then put them in the washing machine together. Use hot water and a tiny bit of soap. Then run them through the dryer. The colors stay brilliant and bright!

Then put them in the washing machine together. Use hot water and a tiny bit of soap. Then run them through the dryer. The colors stay brilliant and bright!

These cute face masks are ready to use for the first day back to school, out running errands or even as teacher gifts. Everyone needs a tie dyed mask!

These cute face masks are ready to use for the first day back to school, out running errands or even as teacher gifts. Everyone needs a tie dyed mask!

Which color combo is your favorite!?

How to make Tie Dye Face masks with Tulip Soda Ash Artisan Kit

If you make some tie dyed masks, share them on social media and tag @doodlecraft so I can cheer you on!

Like, Pin and Share!


How to make Tie Dye Face masks with Tulip Soda Ash Artisan Kit


Check out more tie dye too!


facebook Follow Me on Pinterest Youtube Instagram twitter
postscript

Comments

Beth Watson said…
Zip ties and a grill grate for tie dye - BRILLIANT, Natalie!! I'd love for you to share over at our Creative Crafts Linky Party https://creativelybeth.com/creative-crafts-linky-party-5-join-in-the-fun/
Have a great rest of your week!
Creatively, Beth