How to Make a Circle Wood Sign


This post may contain affiliate links, sponsored content and products received at no cost.
6:00 AM
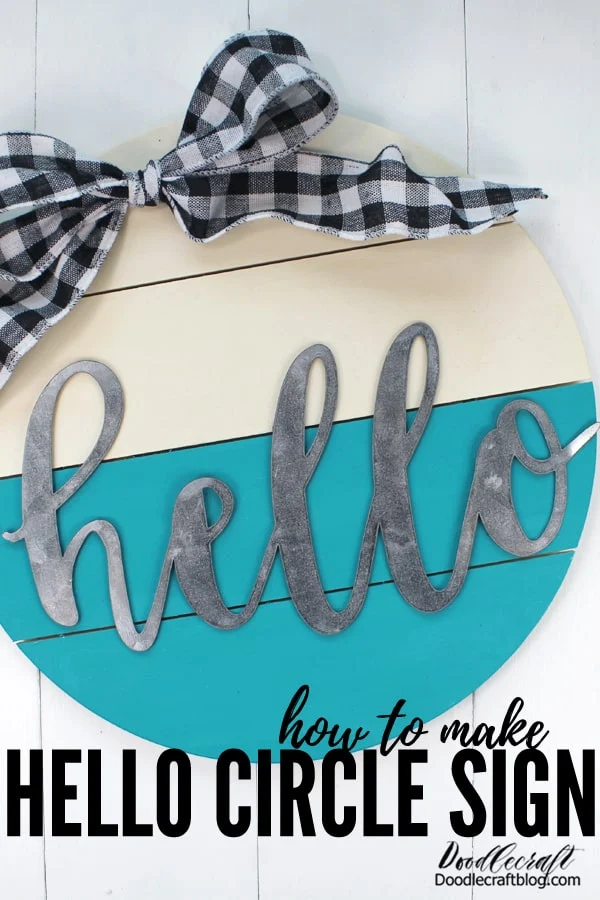
How to Make a Circle Wood Sign!   Make the perfect wood circle hello sign. These circle signs are all the rage and they are a perfect alternative to a wreath or door hanging.     Make a darling hello sign with a wooden circle pallet, some paint, ribbon and a galvanized hello!

How to Make a Circle Wood Sign!


Make the perfect wood circle hello sign. These circle signs are all the rage and they are a perfect alternative to a wreath or door hanging. 


Make a darling hello sign with a wooden circle pallet, some paint, ribbon and a galvanized hello!


How to Make a Circle Wood Sign!   Make the perfect wood circle hello sign. These circle signs are all the rage and they are a perfect alternative to a wreath or door hanging.     Make a darling hello sign with a wooden circle pallet, some paint, ribbon and a galvanized hello!

This cute door sign or entry way plaque is perfect for any time of the year.


They are a great handmade gift and can be customized any way you desire. 


Make them match the holiday or even make them interchangeable.


This cute door sign or entry way plaque is perfect for any time of the year.   They are a great handmade gift and can be customized any way you desire.    Make them match the holiday or even make them interchangeable.


Supplies Needed for Circle Wood Sign:


Supplies Needed for Circle Wood Sign: Wood Pallet Circle (From Plaid Online) (or Get a pack of 4 solid wood circles here) Paint  Paintbrush Buffalo Plaid Ribbon Galvanized Hello Hot Glue/Gun

Step 1: Paint!


Begin by painting the lower half of the sign. I followed the slat lines, so it was super easy. If you have a solid round circle, just use painters tape to mask off a straight line. Then paint the lower half.


I picked a charming turquoise, which feels like Fall to me...but pick whichever color you love.


Step 1: Paint!   Begin by painting the lower half of the sign. I followed the slat lines, so it was super easy. If you have a solid round circle, just use painters tape to mask off a straight line. Then paint the lower half.   I picked a charming turquoise, which feels like Fall to me...but pick whichever color you love.

Step 2: Dry!


Now let the paint dry completely. Use this time to wash out your paintbrush.


Step 2: Dry!   Now let the paint dry completely. Use this time to wash out your paintbrush.

Step 3: Hot Glue!


Now heat up that hot glue gun and hot glue the galvanized hello sign onto the wooden slat circle.


Step 3: Hot Glue!   Now heat up that hot glue gun and hot glue the galvanized hello sign onto the wooden slat circle.


Step 4: Tie a Bow!


Now use the Buffalo Check Ribbon and tie a gorgeous bow. Then hot glue it on the top section of the wood pallet.


You can attach the bow with velcro and make it interchangeable to match other holidays.


Step 4: Tie a Bow!   Now use the Buffalo Check Ribbon and tie a gorgeous bow. Then hot glue it on the top section of the wood pallet.    You can attach the bow with velcro and make it interchangeable to match other holidays.

Add greenery if desired. Check out this post for another fun circle sign option! Easy right! 

Add greenery if desired. Check out this post for another fun circle sign option! Easy right!


That's it!


Make different themes, words, colors and other varieties. These are great to sell, give as gifts, or make for a girls night.


Like, Pin and Share!


How to Make a Circle Wood Sign!   Make the perfect wood circle hello sign. These circle signs are all the rage and they are a perfect alternative to a wreath or door hanging.     Make a darling hello sign with a wooden circle pallet, some paint, ribbon and a galvanized hello!


facebook Follow Me on Pinterest Youtube Instagram twitter
postscript

Comments

Beth Watson said…
Hi Natalie - I just LOVE the use of the turquoise paint for Fall!!
Thanks for joining in the Creative Crafts Fall Edition.
We’d love for you to share over at our weekly Linky Party too!
It runs every Wednesday through Sunday.
Have a great week!
Creatively, Beth