Naruto Group Cosplay Halloween Costumes DIY!
Are you a fan of Naruto? My kids love the show and did a fun cosplay fan convention with their friends a few years ago.
This is the perfect group costume idea for Halloween or comic fandom conventions. I always see a few Naruto cosplayers when I go to conventions...but the bigger the group--the better!
They had a great time at our local library Fandom event and entered the cosplay contest as a group.
We love making costumes for our favorite characters. Make a Naruto, Sasuke, Kakashi and Sakura costume using thrifted items, paint and Cricut iron on!
Of course I recommend getting a Cricut Machine!
Here's the 3 machines to pick from: affiliate links
More than a step-by-step photographic tutorial, this post is meant to give you ideas for creating your own cosplay.
Use a creative mind as you source items for your costume, there are so many options that cost very little money.
Step 1: Sourcing items at the Thrift Store
Begin by a trip to your local thrift store. There's not really a "better" or "best" thrift store. Thrifting takes work and time. Give yourself a couple hours. Don't just look in your "size" section. Clothes get put away wrongly all the time.
Fabric from clothes at the thrift store cost less than buying fabric at the fabric store, so source all the things you can at the thrift or yard sales.
We found a blue shirt, khaki pants and funky shoes for my daughter's Sasuke costume. All the Naruto ninja's wear open toe shoes/boots...so we knew we could cut the toes off these shoes.
Step 2: Alter the Thrifted Items
We cut the toes off the shoes with a razor knife. Then used paint to change the shoes to blue.
Let the shoes dry and they are ready to rock!
Step 3: Cricut Iron-on
The Cricut will swoop in and save your bacon on so many things. Plus, you can run a business from home using your Cricut.
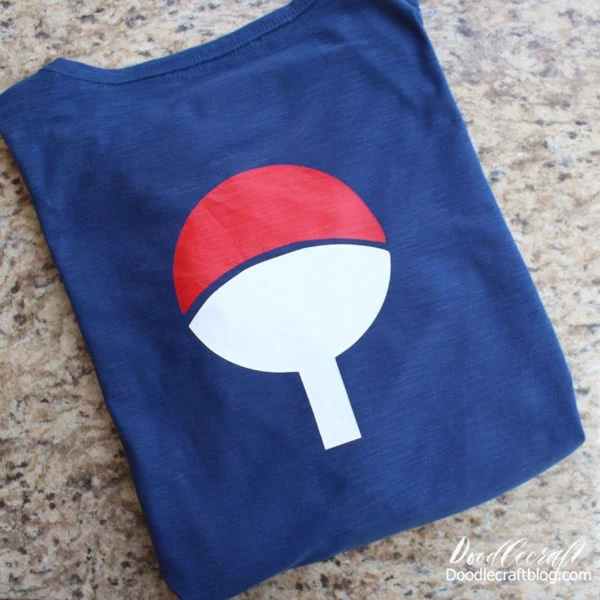
Use Cricut Iron-on vinyl and cut the symbols for the shirts.
Apply them with the EasyPress 2 for the perfect adhesion.
Same idea for the Naruto Hidden Leaf Village Headbands.
For a simple Headband, cut a strip of an old blue t-shirt. Cut this shape with the Cricut and iron it on.
Then iron-on the black hidden leaf symbol.
And hook brads through the headband to look like rivets.
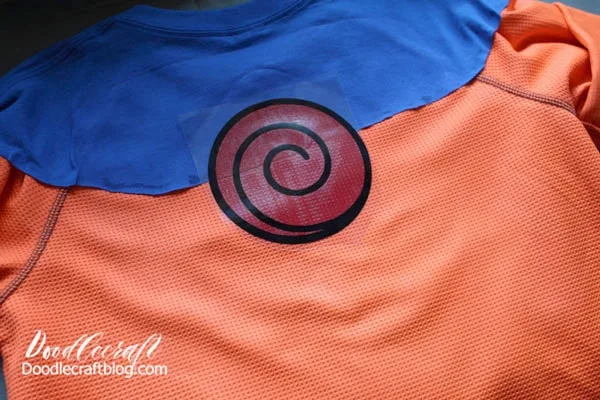
Naruto was created by cutting the top half of a blue t-shirt and sewing it right onto an orange shirt. Then applying the Uzumaki clan symbol...this red dot with black swirl.
In just 2 layers, this looks super official and professional!
We made a fake collar with some white fabric and sewed it in place. The perfect thrifted Naruto cosplay!
Many of the symbols repeat themselves on different characters, so it's easy to save off the image and cut a few. Kakashi needs the Uzumaki clan symbol on his vest too!
Olive green vests are easy to find at the thrift store, plus this can be worn casually any day of the week!
Sakura got creative with her cosplay by hot gluing ribbon around the edges and using iron-on vinyl to make the circle symbols.
My oldest son helped out his siblings by making some wood Kunai for them.
Perfect wood weapons for the extra cosplay touch!
Step 4: Finishing Touches
Then just the finishing touches of face paint, cut off socks, belts, weapon holster, etc.
Hair makes a big difference too. Naruto hair was easy enough since it's his normal color. Just some gel to spike it up.
A messy up do for Sasuke with some black hair spray.
Plus the facial expressions that best embody the character!
Kakashi's details were perfect, although slightly altered from the show...making that book a little more family friendly.
And posing for the classic choking pic. I guess it's become a viral meme.
My kids had an awesome time sourcing their own costumes and working on them with me. I love their creativity! And I love that they got their friends involved!


-min.jpg)


Comments