How to Make a Sublimation Banner!


This post may contain affiliate links, sponsored content and products received at no cost.
6:00 AM

How to Make a Sublimation Banner!  Learn how to make a sublimation banner for parties, birthdays, sports and every occasion!   Just a few supplies are needed to turn photos into a banner...anything you can think of, you can put on this banner.   If you haven't tried sublimation yet, you are going to want to for sure!

How to Make a Sublimation Banner!


Learn how to make a sublimation banner for parties, birthdays, sports and every occasion!


Just a few supplies are needed to turn photos into a banner...anything you can think of, you can put on this banner.


If you haven't tried sublimation yet, you are going to want to for sure!


How to Make a Sublimation Banner!  Learn how to make a sublimation banner for parties, birthdays, sports and every occasion!   Just a few supplies are needed to turn photos into a banner...anything you can think of, you can put on this banner.   If you haven't tried sublimation yet, you are going to want to for sure!

A sublimation banner is perfect to use over and over again.


Make a big happy birthday sign once and use it for years!


Stake it in the yard or hang it on a wall!


Take it to a sports game and roll it up and stuff it in a pocket when not in use.


This sublimation banner is super fun and versatile. 


A sublimation banner is perfect to use over and over again.   Make a big happy birthday sign once and use it for years!   Stake it in the yard or hang it on a wall!   Take it to a sports game and roll it up and stuff it in a pocket when not in use.   This sublimation banner is super fun and versatile.

Supplies Needed for Sublimation Banner:


Supplies Needed for Sublimation Banner:  2x4' Polyester Banner (this 4 pack is a great price--plus you can make a few to sell) Sublimation Printer (or Epson Ecotank Printer converted to Sublimation) Sublimation Paper Cricut EasyPress (12x10) Cricut EasyPress Mat Heat Resistant Tape

Step 1: Iron the Banner


Begin by laying out the folded banner on the table or floor.


Use the Cricut EasyPress to iron it smooth.


It doesn't take long or much heat--I never use an iron...I just use my Cricut EasyPress any time I need to smooth out wrinkles.


Step 1: Iron the Banner   Begin by laying out the folded banner on the table or floor.   Use the Cricut EasyPress to iron it smooth.   It doesn't take long or much heat--I never use an iron...I just use my Cricut EasyPress any time I need to smooth out wrinkles.

Step 2: Print


Then print out all the words, pictures or photographs you want on your banner.


Remember to reverse them so they press the right direction.


I use photoshop for all my digital work. 


There are newer programs and fancy things, but I grew up using photoshop, so it's the easiest solution for me.


I bought the gold mylar balloon font on Etsy, because I was too lazy to make it myself.


I love how it turned out.


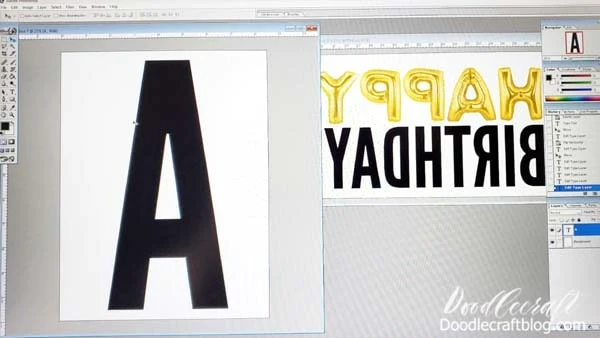
For my banner I created an image in photoshop that was 2x4 feet in size.   I lined up all the words and letters, exactly as I wanted them to appear on the banner.   Then I selected them one at a time and put them on an 8x10 size page. Luckily, every letter fit perfectly on one piece of paper.   Reversed (or mirror) the image and then print.   Repeat that process for each letter.


For my banner I created an image in photoshop that was 2x4 feet in size.


I lined up all the words and letters, exactly as I wanted them to appear on the banner.


Then I selected them one at a time and put them on an 8x10 size page. Luckily, every letter fit perfectly on one piece of paper.


Reversed (or mirror) the image and then print.


Repeat that process for each letter.


Step 2: Print  Then print out all the words, pictures or photographs you want on your banner.   Remember to reverse them so they press the right direction.   I use photoshop for all my digital work.    There are newer programs and fancy things, but I grew up using photoshop, so it's the easiest solution for me.   I bought the gold mylar balloon font on Etsy, because I was too lazy to make it myself.   I love how it turned out.   For my banner I created an image in photoshop that was 2x4 feet in size.   I lined up all the words and letters, exactly as I wanted them to appear on the banner.   Then I selected them one at a time and put them on an 8x10 size page. Luckily, every letter fit perfectly on one piece of paper.   Reversed (or mirror) the image and then print.   Repeat that process for each letter.

Step 3: Layout


Cut the excess sides and edges off the papers so they fit together without overlapping.


Then flip them over (this is why we reverse the images) and tape them in place on the banner using heat resistant tape.


I used my kitchen table to have a large enough space to lay out the full banner, make sure you are on a firm surface (not carpet) but have the EasyPress mat.


Step 3: Layout  Cut the excess sides and edges off the papers so they fit together without overlapping.   Then flip them over (this is why we reverse the images) and tape them in place on the banner using heat resistant tape.   I used my kitchen table to have a large enough space to lay out the full banner, make sure you are on a firm surface (not carpet) but have the EasyPress mat.

Step 4: Heat Press


Set the Cricut EasyPress to 400*F and let it heat up.


Set the timer to 40 seconds.


Now, carefully slip the EasyPress mat under the banner where you are going to begin pressing.


Do one sheet of paper at a time if possible...and try to avoid doing "half" letters as this can cause some glitching.


Step 4: Heat Press  Set the Cricut EasyPress to 400*F and let it heat up.   Set the timer to 40 seconds.   Now, carefully slip the EasyPress mat under the banner where you are going to begin pressing.   Do one sheet of paper at a time if possible...and try to avoid doing "half" letters as this can cause some glitching.

Press the letters with the EasyPress for about 30-40 seconds at 400*F.


The gold color turns out great, not metallic, but really good gold ink for a printer.


Press the letters with the EasyPress for about 30-40 seconds at 400*F.   The gold color turns out great, not metallic, but really good gold ink for a printer.

Leave the letters covered and slide the mat over and press the next letter.


Repeat the process for the whole banner--remember, a sublimation printer can print out photographs too, so adding some fun personal touches would be easy, funny and perfect!


Leave the letters covered and slide the mat over and press the next letter.   Repeat the process for the whole banner--remember, a sublimation printer can print out photographs too, so adding some fun personal touches would be easy, funny and perfect!

Let the banner cool down after all the heat pressing.


Then remove the papers and dispose of them.


Then hang up your banner and reveal the awesomeness...if you look really close at mine, you'll see a very subtle flaw from the sublimation process on the R and the T in Birthday, right at the top. No big deal though!


This super generic birthday banner will be perfect for birthday parties for years to come!


Let the banner cool down after all the heat pressing.   Then remove the papers and dispose of them.   Then hang up your banner and reveal the awesomeness...if you look really close at mine, you'll see a very subtle flaw from the sublimation process on the R and the T in Birthday, right at the top. No big deal though!   This super generic birthday banner will be perfect for birthday parties for years to come!

This is my cute friend, Katie.


She made this awesome banner (with me) to take to a Muse concert last Spring that was held on her birthday!


It was super easy to make with distressed letters and logos.


Then it was easy to roll up, fold in half and tuck the open ends into a back pocket. Easy to get through security and not annoy the other fans around in the stands or on the floor.


This way it was out of the way during most of the concert without having to carry a big cardboard sign--and wondering what to do with it.


It looks amazing, professionally made, and super convenient! 


This is my cute friend, Katie.   She made this awesome banner (with me) to take to a Muse concert last Spring that was held on her birthday!   It was super easy to make with distressed letters and logos.   Then it was easy to roll up, fold in half and tuck the open ends into a back pocket. Easy to get through security and not annoy the other fans around in the stands or on the floor.   This way it was out of the way during most of the concert without having to carry a big cardboard sign--and wondering what to do with it.   It looks amazing, professionally made, and super convenient!

That's it!


Imagine all the possibilities with making your own sublimation banners!


There's so many wonderful reasons to get a sublimation printer and make it work for you--I'll be sharing all about that in an upcoming post.


For now, get your sublimation stuff together and start making banners!


Like, Pin and Share!


Learn how to make a sublimation banner for parties, birthdays, sports and every occasion!   Just a few supplies are needed to turn photos into a banner...anything you can think of, you can put on this banner.   If you haven't tried sublimation yet, you are going to want to for sure!


facebook Follow Me on Pinterest Youtube Instagram twitter
postscript

Comments