Interlocking Acrylic Trees with xTool S1


This post may contain affiliate links, sponsored content and products received at no cost.
6:00 AM

Interlocking Acrylic Trees with xTool S1 and FREE Files!  Let me show you how easy it is to make these adorable interlocking trees using the xTool laser cutting family.   If you have the CO2 laser, the xTool P2, you can cut all the colors, shades and finished of acrylic.   If you have a diode laser, the S1, M1 or other variants, you can still cut quite a few shades of acrylic.

Interlocking Acrylic Trees with xTool S1 and FREE Files!


Let me show you how easy it is to make these adorable interlocking trees using the xTool laser cutting family.


If you have the CO2 laser, the xTool P2, you can cut all the colors, shades and finished of acrylic.


If you have a diode laser, the S1, M1 or other variants, you can still cut quite a few shades of acrylic.


Interlocking Acrylic Trees with xTool S1 and FREE Files!  Let me show you how easy it is to make these adorable interlocking trees using the xTool laser cutting family.   If you have the CO2 laser, the xTool P2, you can cut all the colors, shades and finished of acrylic.   If you have a diode laser, the S1, M1 or other variants, you can still cut quite a few shades of acrylic.

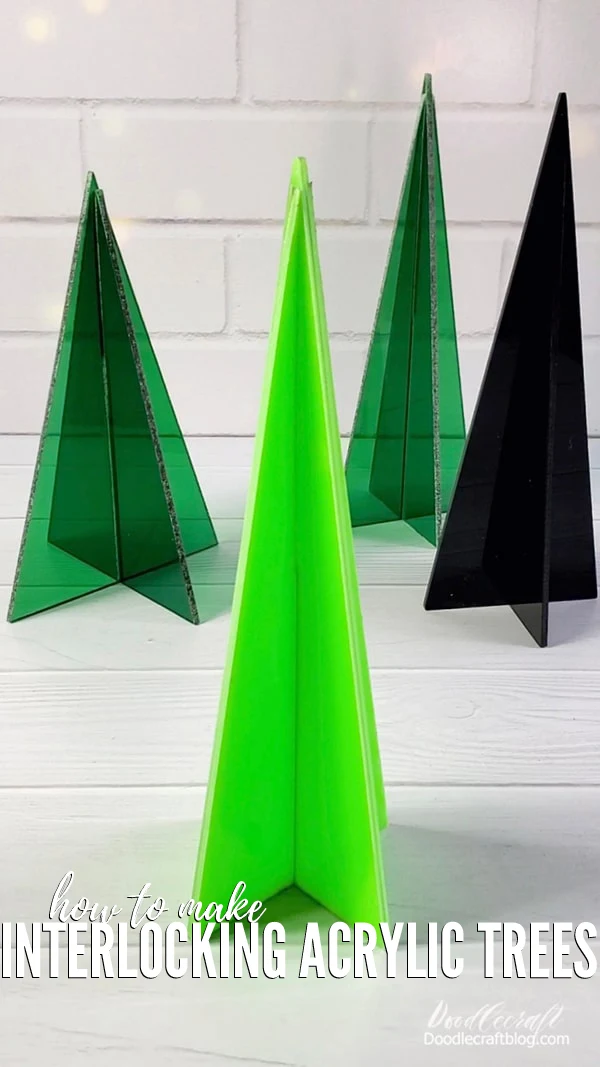
I cut the dark green chubby tree with my xTool M1 and the bright green, green, and black tall trees with the xTool S1.


I've designed this simple triangle tree file and I'm adding the FREE download link at the end of this post.


I cut the dark green chubby tree with my xTool M1 and the bright green, green, and black tall trees with the xTool S1.   I've designed this simple triangle tree file and I'm adding the FREE download link at the end of this post.

I love tall skinny trees.


I have a pencil tree as my Christmas tree set up, so it just made sense to make these tall skinny trees that interlock for the perfect holiday decor.


Cut them out of wood, cardboard or acrylic.


Paint or decorate them.


Cut a whole bunch and fill the mantle with these cute trees!


I love tall skinny trees.   I have a pencil tree as my Christmas tree set up, so it just made sense to make these tall skinny trees that interlock for the perfect holiday decor.   Cut them out of wood, cardboard or acrylic.   Paint or decorate them.   Cut a whole bunch and fill the mantle with these cute trees!

Let's get started.


The xTool S1 just got a much needed/wanted software update so that's been exciting for all S1 users.


The biggest upgrade is the ability to mark different shapes on the software to import your designs into.


For this project though, the upgrade isn't necessary, since we just need a rectangle shape to work with anyway.


Let's get started.   The xTool S1 just got a much needed/wanted software update so that's been exciting for all S1 users.   The biggest upgrade is the ability to mark different shapes on the software to import your designs into.   For this project though, the upgrade isn't necessary, since we just need a rectangle shape to work with anyway.

Supplies Needed for Interlocking Acrylic Trees:


  • xTool S1 (or other laser cutting machine)
  • Acrylic Sheets (I'm using xTool brand: Bright green, Black and Translucent Green)
  • Tree Files (FREE at the end of this post)

Supplies Needed for Interlocking Acrylic Trees:  xTool S1 (or other laser cutting machine) Acrylic Sheets (I'm using xTool brand: Bright green, Black and Translucent Green) Tree Files (FREE at the end of this post)

Step 1: Software Image Upload


First, upload the tree design into XCS.


Then select the outline button and set it to 0.


Then remove the original uploaded design and just leave the blue outline that remains.


Then select the type of material, auto measure the distance and get the marked area selected on the S1.


Then size the tree design to fit.


If you alter the size/shape of the file, the center space for interlocking will also change size and may not fit properly.


Select the material, in this case, acrylic.


I did do a test run on cardboard before putting my expensive acrylic sheet in to cut.


Then I select the xTool preset and click go.


Remember to be by the machine at all times while it is cutting, in case it needs to be stopped.


Step 1: Software Image Upload  First, upload the tree design into XCS.   Then select the outline button and set it to 0.   Then remove the original uploaded design and just leave the blue outline that remains.   Then select the type of material, auto measure the distance and get the marked area selected on the S1.   Then size the tree design to fit.   If you alter the size/shape of the file, the center space for interlocking will also change size and may not fit properly.   Select the material, in this case, acrylic.   I did do a test run on cardboard before putting my expensive acrylic sheet in to cut.   Then I select the xTool preset and click go.   Remember to be by the machine at all times while it is cutting, in case it needs to be stopped.

Step 2: Sanding


After the cutting is done, it will likely take more than one pass, remove the acrylic and slide the 2 pieces together.


The black acrylic cut so perfectly--smoothly and cut in one pass.


The bright green acrylic cut well and needed 2 passes to cut through.


The translucent green acrylic needed 4 passes to cut and needed to be sanded on the edges.


Step 2: Sanding   After the cutting is done, it will likely take more than one pass, remove the acrylic and slide the 2 pieces together.   The black acrylic cut so perfectly--smoothly and cut in one pass.   The bright green acrylic cut well and needed 2 passes to cut through.   The translucent green acrylic needed 4 passes to cut and needed to be sanded on the edges.

I cut the black acrylic with the cover sheet still on the acrylic.


If the acrylic has a paper cover, I keep it on for cutting.


If the acrylic has a plastic cover, I remove it for cutting.


I cut the black acrylic with the cover sheet still on the acrylic.   If the acrylic has a paper cover, I keep it on for cutting.   If the acrylic has a plastic cover, I remove it for cutting.

Sometimes the multiple passes leads to some rough edges, the translucent green had a lot of melting and spattering, during the laser passes.


I just use a nail file to smooth them out.


Sometimes the multiple passes leads to some rough edges, the translucent green had a lot of melting and spattering, during the laser passes.   I just use a nail file to smooth them out.

Step 3: Interlock Acrylic Trees


The file is made so that the 3mm acrylic slides into the grooves perfectly.


I used the same cut file for 3.5mm corrugated paper (cardboard) and the 3mm basswood.


This file is perfect for a variety of materials.


Step 3: Interlock Acrylic Trees   The file is made so that the 3mm acrylic slides into the grooves perfectly.   I used the same cut file for 3.5mm corrugated paper (cardboard) and the 3mm basswood.   This file is perfect for a variety of materials.

The grooves are deep enough to slide together and meet up at the top perfectly.


The grooves are deep enough to slide together and meet up at the top perfectly.

Repeat in all the colors of acrylic that your machine can cut.


Make a row on the mantle, use them as a table centerpiece, or add them to your Christmas snow village!


Repeat in all the colors of acrylic that your machine can cut.   Make a row on the mantle, use them as a table centerpiece, or add them to your Christmas snow village!

That's it!


They are darling and easy to make.


If you cut them out of 3mm wood or corrugated cardboard, you can paint them and decorate them!


Makes a fun craft for kids, parties and school crafts too!


Everyone needs a laser cutter!


That's it!   They are darling and easy to make.   If you cut them out of 3mm wood or corrugated cardboard, you can paint them and decorate them!   Makes a fun craft for kids, parties and school crafts too!   Everyone needs a laser cutter!

Hope you love this interlocking acrylic tree craft!


If you do end up making some, take pictures--email them to me (maildoodlecraft @gmail.com), post them on social media and tag @doodlecraft so I can cheer you on!


I can't wait to see how you use these interlocking trees!


Hope you love this interlocking acrylic tree craft!   If you do end up making some, take pictures--email them to me (maildoodlecraft @gmail.com), post them on social media and tag @doodlecraft so I can cheer you on!   I can't wait to see how you use these interlocking trees!

Interlocking Tree Display!


Make interlocking acrylic trees with the xTool S1 Laser Cutting Machine!


These cute trees can be cut from cardboard, basswood or acrylic.


Paint and decorate them or leave them modern and chic.


Like, Pin and Save!

Interlocking Tree Display!  Make interlocking acrylic trees with the xTool S1 Laser Cutting Machine!   These cute trees can be cut from cardboard, basswood or acrylic.   Paint and decorate them or leave them modern and chic.   Like, Pin and Save!

Here's the files:


I made a png of a 4x8 tree and a 3x8 tree (the tall skinny ones I did).


There is also an xTool XCS file of the 3x8 tree and the 4x8 tree.


Enjoy!


Here's some more helpful posts on xTool Laser Cutters, which one to buy, what are the difference and how to start a Laser Cutting Business!


Risk: There is some potential risk involved.   Lasers are focused beams of light, that can potentially start on fire.   Laser Cutters should be monitored while the machine is working at all times.    This can be tricky, especially since some projects take hours to cut.   Having the laser cutter in a convenient spot is very helpful.   Some people buy room cameras to monitor while they work, but the machine really should not be left unattended.   The Air Assist definitely helps reduced risk of scorching and charring too, so having that is a "must".   Having a Fire Extinguisher rated for electronics or a fire blanket is recommended.

Find out all about the xTool S1 here at this post:
Introducing the xTool S1 Laser Cutting Machine!  I've got a new tool in my craft arsenal, say hello to the xTool S1 20W Laser Cutter!   The S1 is a dedicated laser that has changeable laser heads for different watts of power for different projects or types of materials.   It has some awesome features, expanding capabilities and more power than my last machine.   I'm going to share everything I know about the xTool S1 in this post!


Do you wear earrings?   I got my ears pierced when I was 6.    When I was 19 and got married, I stopped wearing them completely.    I love making earrings, but not wearing them...so I've got these ready for a last minute gift!


Comments

Sheila Smith said…
Amazing that you also Love XTool and have decided to share a file for Cutter/Engraver Machines with all of us!!! The hubby and I just gifted ourselves the P2 and F1 for Christmas!!! We plan to inbox the F1 tomorrow and were questioning what we wanted to start to make first!?! Thanks to you, we now have our very first file!!! We also appreciate how you took your time to describe each and every step...even the measure bits. It's the reality of what happens when using this type of laser cutter/engraver. We will for sure take pics and post them back to you!!! Thank You!!!