Metal Sublimation Fallout Vault-Tec Lunchbox DIY!
Lunchboxes on Fallout are icon and a fun item to find or buy during gameplay.
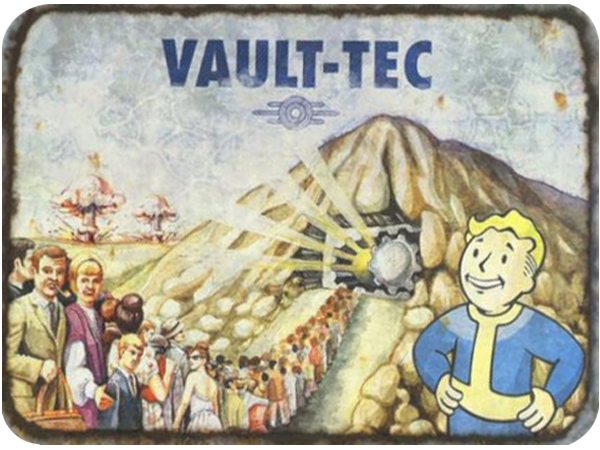
They picture a line up of people going into the vault with a Vault Boy in the bottom corner.
The edges of the lunchbox are typically decorated with Vault Boy in various perk poses...but I'm keeping this one simple.
Let's make a Fallout Lunchbox Prop using sublimation! (FREE image at end of post)
Get a random item or a Nuka Cola in Fallout 4, Share a perk with friends in Fallout 76, get a prize in Fallout Shelter!
Fallout lunchboxes are so much fun!
Okay, really, I had no clue what they were for when I played Fallout 76 for a long time.
We'd just open them up at a train station and take pictures in photomode of us holding the lunchbox up in the air and confetti falling all around us.
Lol.
Then we realized they assigned random perks, so then we started opening them right before big events.
It's part of the fun to figure new things out.
I had this old white lunch box for years and am finally using it.
I bet you can find one to upcycle at a thrift store--in a pinch, you could use a cardboard box!
Supplies Needed for Vault-Tec Lunchbox:
Step 1: Printing
Begin by printing out the Vault-Tec Lunchbox design in reverse on sublimation paper.
Size it to fit the front of your lunch box with a tiny border.
Right click to save off the Vault-Tec Lunchbox png.
Step 2: Sublimation
I didn't sublimate this design directly onto the lunchbox.
This way I can use the lunchbox for something else down the road if I want.
Instead I sublimated onto thin aluminum sheets, and adhered it to the lunchbox.
Begin by cutting out the sublimation paper design with scissors.
Peel off the protective plastic from the surface of the metal sublimation blank before sublimating.
Take the sublimation paper printout and place it on the sublimation blank, face down.
The sublimation ink with instantly turn to gas and adhere to the sublimation blank.
Tape the print in place with heat resistant tape, so it doesn't shift during heating.
Does not actually have to be taped on every edge like tumblers.
Cover with parchment paper, butcher paper or a teflon sheet and then press with the Cricut EasyPress for one minute at 400*F.
Step 3: Sublimation Reveal
Let the sublimation print cool down completely, the metal is hot--just needs a few minutes to cool down!
Once it's cool, remove the heat tape and reveal the print--this is the BEST part!
Perfection--I am always thrilled with the sublimation print result!
It's bright and vivid in color!
I love it, the distress vibe is there because of the image, but it's pristine!
Step 4: Adhere to Lunchbox
This sublimation aluminum blank is thin enough to cut easily with scissors.
Just trim down the image and round off those corners to fit on the lunchbox.
Now use the Tombow Xtreme Adhesive to adhere the metal sublimation print to the lunchbox, just a strip of adhesive on all 4 sides of the print will do it.
The metal is so thin, it is barely noticeable on the lunchbox, almost completely seamless looking.
Center the print on the lunchbox and press it down firmly.
Now the Vault-Tec lunchbox can be filled with cram, moldy food, Nuka Cola, and all sorts of fun surprises!
These would make awesome party favor bags too.
Fill them with treats, trinkets and novelty toys!
I'm totally using my lunchbox as party decorations and then home decor.
I love how it turned out!
I need to plan a cosplay outfit--maybe a Vault dweller...I need a blue jumpsuit. Hmmm.
That's it!
The Vault-Tec Lunchbox is full of surprises and makes an awesome handmade Fallout prop for an upcoming party, cosplay or home decor!
Sublimation makes so many amazing things possible!
Here's the link to my folder of FALLOUT THEMED FREEBIES

-min.jpg)
-min.jpg)
-min.jpg)
-min.jpg)
-min.jpg)

-min.jpg)
-min.jpg)
-min.jpg)
-min.jpg)
-min.jpg)
-min.jpg)
-min.jpg)
-min.jpg)
-min.jpg)
-min.jpg)
-min.jpg)
-min.jpg)
-min.jpg)
-min.jpg)
-min.jpg)

-min.jpg)
-min.jpg)

-min.jpg)

-min.jpg)
-min.jpg)
-min.jpg)


-min.jpg)


Comments