How to Make Japanese Paper Dolls with Origami Paper
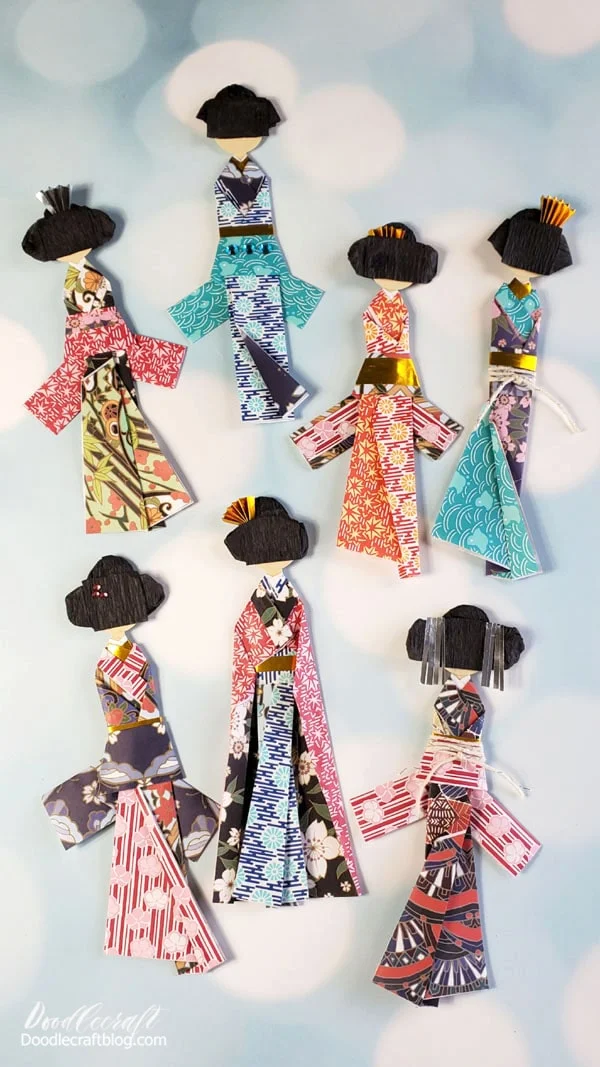
Learn how to make Japanese Paper Dolls with origami paper.
These adorable layered geisha girls are the perfect handmade gift tags, bookmarks or even wall art.
These are not origami (paper folding with no glue), but use the vibrant shades of origami paper to capture the traditional origami vibe...as a paper doll.
History:
These little paper dolls are so much fun to make and actually part of Japanese tradition.
During the Heian period in Japan, it was a time of peace and that always brings out the Arts.
These little paper dolls became popular along side the Mataro doll, or wooden dolls decorated in silks.
I'm guessing paper was a little easier to come by for people than silk, making these a popular choice.
These are fun to make for special occasions, or as a fun paper craft with a class or older kids, as part of a Historical Arts lesson.
Today I am just making these little Japanese girl dolls, although the book I'm using does have additional following categories of children and men as well...maybe I will do more someday.
For this craft I was able to review the Blick Yasutomo Origami Kit as a Blick Creator.
It has gorgeous patterned, plain and a couple tiny squares of metallic paper I could use for this Japanese Paper Doll craft.
Plus, the bamboo folder and storage pouch are awesome too.
Backstory:
Back in 2001-2009, my husband and I ran a martial arts school.
We taught Tae Kwon Do 6 days a week. We started our business when our oldest child was 3 months old and closed the doors after the economic crisis in 2008, when our youngest child was 3 months old.
It was a fun phase of our lives.
We collected a lot of Asian vibe decor pieces, including a 20 inch gong that still hangs in our home.
One of our students (and friend) brought this book to me. She found it at the thrift store and thought I'd like it--I did!
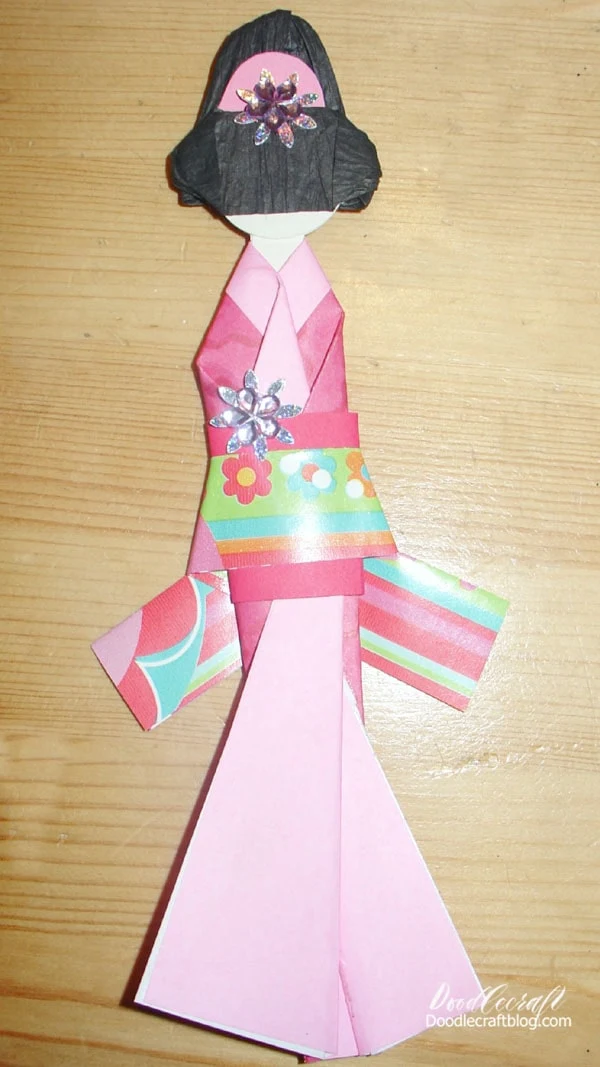
It's all Japanese, so I guessed on the assembly and made about 25 of these little dolls circa 2006.
We gave them to our students for the holidays or something like that.
Here's one of the originals:
Anyway, I found this book again as I was Spring cleaning and thought it would be fun to make them again. I loved making them. Picking the papers, folding the shapes, so therapeutic and fun--would definitely make again!
Blick sending me the origami paper was the perfect inspiration and motivation!
Let's get started!
Supplies Needed for Japanese Paper Dolls:
- Cream, Pink, Ivory or off-White Cardstock
- 1" hole Punch (or Cricut machine to cut 1 inch circles)
- Paper Cutter
- Tombow MONO Liquid Glue
- Blick Yasutomo Origami Kit
- Black Crepe Paper or Rafia Paper Twist
- Scissors
- Embellishments (optional)
Step 1: Head and Neck
Begin by cutting 1 inch circles out of the plain cardstock, one for each doll you are making.
Cut strips of cardstock about 1/4" wide and one inch long.
Then glue one strip on to each circle, making a head and a neck.
Step 2: Collar
Use some paper and make a collar around the top part of the neck.
The book suggests 2 layers of collars, you can decide...some of mine I did with 2 collars and some just one.
Cut a strip of paper about 1/2" wide and an inch long, then fold it in half the long way.
Place the folded edge up by the head and glue the strip in place with just a little do to of glue on the back of the neck.
Then fold the collar over and overlap them in front, gluing them together with a little tiny dot of glue.
Step 3: Kimono Dress
Now pick 2 pieces of patterned origami paper that you love.
They do not need to match at all--in fact the color and pattern contrast is the key to the finished piece.
Cut them each at 3 inches wide.
Then stack them together so the patterns are both on the outside.
This way when you fold the dress and the inside pattern shows, it will pop.
Fold down 1/4 inch of the papers together at the top.
Then lay flat on the table with the folded part on the surface of the table.
Use a tiny dot of glue to glue the head/neck/collar right in the center of the paper.
Then fold the right top corner of the patterned paper over the top, at a sharp angle, and leaving the layers of the collars visible.
Then fold down the other shoulder, making the shoulders even on both sides.
Fold the same side over all the way to the bottom of the dress.
Then fold the other side over the top.
Line up the base of the dress so there is the effect of little ankles/feet at the base.
Then open up the base flaps of the dress to expose the inside pattern paper.
There is a variety of ways to fold the dress, so experiment with the shape and style you like best.
Step 4: Waist Band
Now fold a waist band with a 2 inch strip of paper.
Fold it in half and then place it on the front of the paper doll and wrap it around the back of the dress with a overlap crisscross.
Leave the tails long in the back and glue them in place.
Step 5: Hair Piece
The hair is made with 3 different pieces of black crepe paper or paper twist.
Paper Twist is a little bit stronger, so if you are using crepe paper like me, just twist gently to avoid tearing.
- Bangs: 1x2 inch
- Back hair pieces or Bun: 2.5x2 inch
- Front hair piece or side buns: 4x1 inch
Begin with the nearly square piece of crepe paper.
Put it around the one inch circle head of the Japanese paper doll then twist it gently at the top of the head.
Remove the hair piece from the doll.
Twist the top of the bun over so it meets up with the dome and tucks into itself and glue it together.
This makes the perfect dome bun for the hair.
Set it aside until the assembly portion at the end.
Take the thinner strip of crepe paper and twist it about 1 inch from the end on both sides.
Again, twist the other side about 1 inch from the edge.
Twist gently so the crepe paper doesn't just tear.
Now for the hair piece assembly.
Add a little bit of glue to the front of the head piece of the doll.
Place the long strip with the twists on both ends right on top of the head circle, leaving a little peak of the chin showing.
Then add glue on top of the long hair piece.
Then place the bangs piece over the top of the hair.
Place it about the same length as the previous hair piece or maybe a little titch longer.
Then fold the bangs over the head.
You can shape the crepe paper around the head as closely as you want, creating the curve of the head or just leaving it straight across.
Then use the glue and adhere the bun we created in the first step to the back of the head.
Then wrap the second layer, with the twists on the ends over and glue them to the back of the head too.
Step 6: Embellishments
Then add any little embellishments or flair you can think of.
I loved using a small piece of metallic origami paper to add some shine on these dolls.
A little collar, folded like a fan and put in the hair, or a little touch on the waist band.
Add some twine to the waistbands, jewels across the belt or in the hair...dangles, this is the time to just be creative!
Then make more adorable Japanese paper dolls--it's seriously addicting!
It's so fun to pick different colors and patterns, different styles of hair or embellishments.
If you keep them a little flatter, without gems, it's going to be a little better for a bookmark.
Make different dress shapes, add a cape instead of a tie back, add layers and other details.
Again the book I am referencing showcases men, children and multiple varieties of women.
It's a great starting point to make these little Japanese dolls and then get creative with new arrivals--making little families for wall art, making all your friends in a line up...or sticking in a colorful book.
That's it!
Making a Japanese paper doll is a fun way to use origami paper in a new way!
Use these little dolls as bookmarks, gift tags or just as the perfect paper craft for a Spring day.
If you end up making some, post a picture and tag me @doodlecraft so I can cheer you on!

-min.jpg)
-min.jpg)
-min.jpg)
-min.jpg)

-min.jpg)
-min.jpg)
-min.jpg)
-min.jpg)
-min.jpg)
-min.jpg)
-min.jpg)
-min.jpg)
-min.jpg)
-min.jpg)
-min.jpg)
-min.jpg)
-min.jpg)
-min.jpg)
-min.jpg)
-min.jpg)
-min.jpg)
-min.jpg)
-min.jpg)
-min.jpg)
-min.jpg)
-min.jpg)
-min.jpg)
-min.jpg)
-min.jpg)

.JPG)
.JPG)
.JPG)


-min.jpg)


Comments