
-min.jpg "Anthropologie Inspired Monogram Mug DIY with Cricut Infusible Ink Learn how to make an Anthro inspired monogram mug with Cricut Infusible Ink and Cricut Mug Press. This DIY is a little complex, using 4 colors of infusible ink, but it's finish is well worth the effort! Plus, the mug is dishwasher and microwave safe! Be sure to watch the video tutorial in this post!")
Anthropologie Inspired Monogram Mug DIY with Cricut Infusible Ink
Learn how to make an Anthro inspired monogram mug with Cricut Infusible Ink and Cricut Mug Press.
This DIY is a little complex, using 4 colors of infusible ink, but it's finish is well worth the effort!
Plus, the mug is dishwasher and microwave safe! Be sure to watch the video tutorial in this post!
-min.jpg "Anthropologie Inspired Monogram Mug DIY with Cricut Infusible Ink Learn how to make an Anthro inspired monogram mug with Cricut Infusible Ink and Cricut Mug Press. This DIY is a little complex, using 4 colors of infusible ink, but it's finish is well worth the effort! Plus, the mug is dishwasher and microwave safe! Be sure to watch the video tutorial in this post!")
Anthropologie Knock Offs:
Anthropologie is such a fun store to walk through and explore.
They have kitschy type unique items, and limited quantity eclectic goods sourced by local artists.
I absolutely love walking around, getting ideas from their fun products and awesome decor.
I love the mugs, I have a thing for mugs...I have way too many, just in case I need some hot chocolate with 54 of my best friends.
Mostly I keep an eye out at the local thrift store for any anthro mugs I find there...and snatch them up. The thrift shop is definitely one of my most favorite stores ever!
I've been eyeing these ones for a long time and decided to DIY it.
-min.jpg)
Supplies Needed for Anthro-Inspired Monogram Mug DIY:
- Cricut Maker 3
- Cricut Infusible Ink (4 colors)
- Cricut Mug Press
- Cricut Mug Blank
- Heat Resistant Tape
- Cricut Design Space (Flowers with Stems)
- Here's my Cricut Design File so you can see it
-min.jpg)
Step 1: Mug Design
First select images from Cricut Design Space--I love having Cricut Access for this reason.
Search for "flowers with stems" images and add the ones you like to your canvas.
Then change the different sizes and colors of all the flowers so there are only 4 colors and they are all about the same size as the mug.
Select a font for the Monogram and type in the letter of choice.
Then REVERSE all the letters and images on the canvas.
-min.jpg)
Cricut Design Space will separate the images by color when you go to cut them out.
Make sure they are attached to each other so they line up in the same configuration as the stems.
Then place the Infusible Ink Transfer on the Cricut Mat with minimal touching of the ink surface.
-min.jpg)
Let the Cricut machine cut out each of the images on each color sheet--there's peachy pink, yellow green, blue green and violet blue.
Cricut Design Space will let you know which color mat to load next.
-min.jpg)
I love this watercolor Infusible Ink set, because it comes with all 4 colors I want and they are all in the same watercolor pattern style, so the watercolor flowers design is really cohesive.
-min.jpg)
I love using Infusible Ink over paint markers or making a sharpie mug with a mug from the dollar store because they are long lasting and will not wash off.
-min.jpg)
Step 2: Weed Infusible Ink
After cutting the designs in the Cricut Infusible Ink, use scissors to cut a box around the cut out.
Then weed out the excess infusible ink from the cut out design.
-min.jpg)
Step 3: Combine Infusible Ink Layers
Now that the images are cut out from the sheets, they need to be combined in layers.
Add the pink blossoms to the green stems, line them up just as pictured on Cricut Design Space.
-min.jpg)
The infusible ink should stick to the transfers easily as you work, if they have trouble or don't have enough room you can use heat resistant tape.
-min.jpg)
Step 4: Tape to Mug Blank
Now align the Infusible Ink transfers on the mug and tape them in place with the ink side touching the blank with heat resistant tape.
-min.jpg)
Line up the Monogram on the center of the side of the mug you see the most while drinking.
I'm right handed so it's on the side where the handle is on the right.
Tape everything down securely, leaving no air gaps, so the transfer will be seamless.
-min.jpg)
Step 5: Heat Press the Mug
After taping all the Infusible Ink down, cover the mug in parchment paper and tape it in place.
The parchment paper does not need to be taped on all the edges, just tack it in place on the 4 edges.
-min.jpg)
Plug in the Cricut Mug Heat Press and wait until the heat element warms up and beeps to let you know that the mug press is ready to use.
Then slide the mug into the Cricut Mug Press and clamp it down.
-min.jpg)
Step 6: Reveal
After going through the full heat press process, remove the mug from the Cricut Mug Press and let the mug cool down.
Then remove the parchment paper, the Infusible Ink and heat resistant tape.
The reveal is the BEST part!
I love seeing the vivid image transfer infused on the mug--transforming this beveled mug blank into a gorgeous Anthro knock off mug!
-min.jpg)
I love the watercolor effect of the Infusible Ink!
The blue handled/inside mug gives the Anthro vibes already, so it's the perfect blank for this project.
-min.jpg)
This mug makes the perfect addition to an Anthropologie inspired Gift Basket!
This trucker hat was made with Cricut Hat Press and I've got a full tutorial on that here.
-min.jpg)
That's it!
What do you think of this Anthropologie Inspired Monogram Mug!?
I love it, I love the 16 ounce size--perfect for my warm protein shakes.
I love the watercolor flowers and the blues.
Makes a great gift, bridesmaid gift basket, teacher gift with a gift card or just to make for yourself!
Like, Pin and Save!
-min.jpg "What do you think of this Anthropologie Inspired Monogram Mug!? I love it, I love the 16 ounce size--perfect for my warm protein shakes. I love the watercolor flowers and the blues. Makes a great gift, bridesmaid gift basket, teacher gift with a gift card or just to make for yourself!")
Here's some more great crafts you might be interested in -- lots of tutorials!
How to Make Trucker Hat with Cricut Hat Heat Press
-min.jpg "Learn how easy it is to make a trucker hat with the Cricut Hat Heat Press and Infusible Ink Transfers. Make all your teams hats, family reunion garb, Summer camp matching hats, or just to update your wardrobe a little bit. The Cricut Hat Press makes hat making a cinch!")
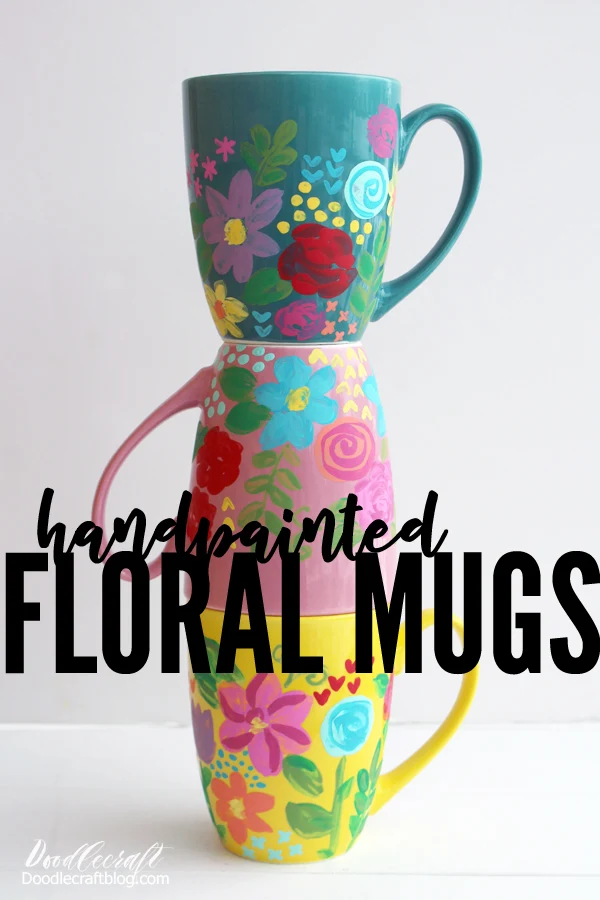
Floral Hand Painted Mugs
Jump into the world of super cool hand-painted Folk Art style mugs!
We're talking about turning plain cups into amazing works of art with colorful paints and dishwasher safe Mod Podge and a foam brush.
It's like magic for your morning coffee or tea...or in my case, hot protein shakes!
Let's learn how to make these awesome mugs that are totally unique and full of style! 🎨✨
How to Make a Mug with Cricut Infusible Ink in Oven!
Making a mug using Cricut Infusible Ink is a game changer! Cricut Infusible Ink works on a sublimation ceramic mug and can be done without a heat press in your own oven.
Make a custom mug using Cricut Infusible Ink as the perfect handmade gift.
This post will teach you all about making a sublimation mug using Cricut Infusible ink in your own oven.
The CRICUT MUG PRESS will make mug making a cinch--but here's how to do it without one.

How to Use the Cricut Mug Press
Making mugs is my favorite craft and Cricut has made it so easy! The Cricut Mug Press is a heat press that is designed specifically for sublimation on mugs, tumblers and other cylinders. Make a custom mug from start to finish in a half hour or less--the perfect craft for a last minute gift.
The Cricut Mug Press is a game changer. I've been making sublimation mugs in the oven since last year and love how they turn out...but I love not having to use my kitchen for sublimation. The Mug Press is the perfect size for a craft shelf. It heats up fast and takes about 5 minutes to infuse a mug.


-min.jpg)


Comments