
-min.jpg "How to Make Monogram Resin Keychains DIY Tutorial Learn how to make monogram resin key chains with colorful tassels! Resin keychains are easy to make, are great gifts and perfect for back-to-school backpack flair. You just need a letter mold, a small amount of resin and some hardware--and not much time at all before you have monogram keychains!")
How to Make Monogram Resin Keychains DIY Tutorial
Learn how to make monogram resin key chains with colorful tassels!
Resin keychains are easy to make, are great gifts and perfect for back-to-school backpack flair.
You just need a letter mold, a small amount of resin and some hardware--and not much time at all before you have monogram keychains!
-min.jpg "How to Make Monogram Resin Keychains DIY Tutorial Learn how to make monogram resin key chains with colorful tassels! Resin keychains are easy to make, are great gifts and perfect for back-to-school backpack flair. You just need a letter mold, a small amount of resin and some hardware--and not much time at all before you have monogram keychains!")
Monograms are a trend that will never go away. Everyone wants a keychain with their name or letter on it. Remember going to the gas station or a fair stall and searching the keychains for your name when you were young?
My name is Natalie, and there aren't very many N names for girls--Nancy and Nicole...and Natalie...so I could usually always find my name. But I never got to buy a keychain with my name on it...I felt upset about it as a child, but now that I'm an adult, I realize how overpriced they were!
I guess I craft the things I wish I could have had when I was a little girl.
You'll see I made an N...that is the one I kept for myself. I made a bunch for friends and family and they make the perfect gifts or gift tags for a bigger gift.
Resin crafts are so much fun and easier than you might think.
If you haven't tried resin crafting yet, this is your sign to give it a try today!
-min.jpg "Monograms are a trend that will never go away. Everyone wants a keychain with their name or letter on it. Remember going to the gas station or a fair stall and searching the keychains for your name when you were young? My name is Natalie, and there aren't very many N names for girls--Nancy and Nicole...and Natalie...so I could usually always find my name. But I never got to buy a keychain with my name on it...I felt upset about it as a child, but now that I'm an adult, I realize how overpriced they were! I guess I craft the things I wish I could have had when I was a little girl. You'll see I made an N...that is the one I kept for myself. I made a bunch for friends and family and they make the perfect gifts or gift tags for a bigger gift. Resin crafts are so much fun and easier than you might think. If you haven't tried resin crafting yet, this is your sign to give it a try today!")
Supplies Needed for Resin Letter Keychain:
- Alphabet Silicone Molds
- 2 Part Epoxy Resin
- Eye Screw
- Key Ring or Keychain Hardware or Jewelry Kit
- Tassels and Keychain Hardware (or just tassels)
- Chunky Glitter
- Mixing Cup
- Stir Stick
- Alcohol Inks
- Gold Leaf
- Heat Gun
- Jewelry Pliers
- Drill with Small Drill Bit
- Protective Gear (mask, gloves, well-ventilated area)
-min.jpg "Supplies Needed for Resin Letter Keychain: affiliate links Alphabet Silicone Molds 2 Part Epoxy Resin Eye Screw Key Ring or Keychain Hardware or Jewelry Kit Tassels and Keychain Hardware (or just tassels) Chunky Glitter Mixing Cup Stir Stick Alcohol Inks Gold Leaf Heat Gun Jewelry Pliers Drill with Small Drill Bit Protective Gear (mask, gloves, well-ventilated area)")
Step 1: Mix the Resin
Begin by mixing equal parts of resin and hardener in a mixing cup. I mixed one ounce of resin and one ounce of hardener together.
I'm just making a couple ounces of resin for this, but a good way to know how much you'll need is to fill the silicone resin mold with water and pour it out into a measuring cup to know the volume.
Then mix up that much resin.
Make sure to read the directions of the resin thoroughly.
Mix up the resin according to package directions, paying careful attention to the mixing time and work time of the resin.
Don't whip the resin, stir it gently and slowly, scraping the stick and the side of the measuring cups as you go so you don't add more air bubbles into the resin.
**HOT TIP: Keeping an alphabet mold on hand like this is perfect for other resin projects when you have a little bit of resin leftover.
Just pour it out into the mold until you have complete letters. It's a great way to reduce any waste when working with resin, as it can be quite pricy.
-min.jpg)
Step 2: Pour Resin into Silicone Alphabet Mold
Make sure the silicone mold is on a covered level work area.
Then pour a small amount of mixed resin in the resin mold.
I only pour resin in the letters I wanted to make into keychains.
If you want to make different colors of resin letters, split the mixed resin into smaller measuring cups and add alcohol inks or resin dyes for the color.
You can make solid color letters, add glitter and gold leaf or keep them totally clear.
I love the clear resin and gold leaf, so pour a first layer of resin in the mold, just slightly less resin than filling the full letter mold.
-min.jpg)
Step 3: Resin Add Ons!
Next step is to add the glitter, gold leaf flakes or other sprinkles to the resin.
Add a few gold or silver flakes into the resin, press it into the resin gently with a stirring stick.
Start with a few flakes or be really generous with them, they look amazing floating and dancing in the layer of clear resin.
-min.jpg)
Then sprinkle some glitter on the resin, I used a mix of fine glitter and chunky glitter in the resin.
A great way to add variety to the keychain is to just add the glitter in a stripe across the letter.
No need to mix it into the resin with the stick, it can just be focused on the back of the monogram.
-min.jpg)
Then add in some chunky glitter, white resin or dumping glitter into the clear resin and mixing it so the monogram is completely glittered. The white resin will sink into the resin creating beautiful shapes in the monogram, and making the glitter come with it a little bit too.
Then let the resin cure for a long time, at least 24 hours.
There's a lot of variations that can be made for these awesome resin keychains, so just make it your own resin keychain.
-min.jpg)
Step 4: Keychain Hardware
After the resin piece is completely cured, remove it from the silicone mold.
The reveal is the best part--did it work the way you expected...does it look amazing!? Yes!
The first thing is to just enjoy how well the glittery gold leaf letters turned out! These fun letters can be used for so many other fun things. I made a cake topper with smaller letters here.
-min.jpg)
I'm turning these monograms into keychains that can be used for zipper pulls, backpack flairs, gift tags, and more...but they could also be turned into a resin pendant, stocking tags, luggage tags or other kinds of jewelry!
-min.jpg)
Use a drill with a small drill bit, the size of the eye screws, and drill a small hole on the top of the letter where it will hang from.
Most letters it is easy to decide where they will hang from. Letters like T or K can be a little more work to decide which placement is best for hanging.
-min.jpg)
Just drill straight into the resin and discard the curled resin debris.
Most resin, if properly mixed, is food safe...but if you are planning on using your resin in a cake or on food, be sure to double check that it is indeed food safe.
-min.jpg)
Then screw in the eye screw until tight, but not over tightened as the shaft can break off easily...trust me, I know this by experience.
It's a good idea to use the jewelry pliers to help tighten them, your finger tips will thank you.
**NOTE: If there are rough edges or a sharp edge on the resin letter, use sandpaper or a nail file to sand it down so it's nice and smooth. I had no issues, the resin cured beautifully.
-min.jpg)
Then add the most important parts to the monogram with large jump rings--the keychain rings and colorful tassel!
You can see how the N got the aqua tassel, that's because it's my favorite color--my childhood dreams are fulfilled in this fun resin craft!
The tassels are not necessary, but add a pop of color and make it so much fun!
-min.jpg "Then add the most important parts to the monogram with large jump rings--the keychain rings and colorful tassel! You can see how the N got the aqua tassel, that's because it's my favorite color--my childhood dreams are fulfilled in this fun resin craft! The tassels are not necessary, but add a pop of color and make it so much fun!")
Now make one for all your family members, friends, coworkers and teachers!
Making your own resin monogram keychains is awesome for handmade gifts, save these for the holidays and you'll be so glad you planned ahead.
If you are new to resin crafts, this is a great place to start, and the perfect first project. If you are experienced with resin, these are a fun picnic project to make in just 15 minutes.
Smaller pieces like these monograms have easy steps for learning how to work with resin.
Because the silicone mold is clear, you can do this with UV resin if you work in small amounts of resin layers at a time.
-min.jpg "Now make one for all your family members, friends, coworkers and teachers! Making your own resin monogram keychains is awesome for handmade gifts, save these for the holidays and you'll be so glad you planned ahead. If you are new to resin crafts, this is a great place to start, and the perfect first project. If you are experienced with resin, these are a fun picnic project to make in just 15 minutes. Smaller pieces like these monograms have easy steps for learning how to work with resin. Because the silicone mold is clear, you can do this with UV resin if you work in small amounts of resin layers at a time.")
That's it!
Making monogram resin keychains is a fun and easy craft, perfect for handmade gifts, backpack flair and much more.
This project is perfect for all resin skill levels, beginners to advanced and are fun for tween age and up.
Get your resin supplies together and make a few key chains today!
Like, Pin and Save!
-min.jpg "Making monogram resin keychains is a fun and easy craft, perfect for handmade gifts, backpack flair and much more. This project is perfect for all resin skill levels, beginners to advanced and are fun for tween age and up. Get your resin supplies together and make a few key chains today!")
Here's more DIY resin keychain ideas--which is your favorite!?
Resin Candy Sprinkles Keychain DIY
A great bag needs a pull on the zipper.
Let's make one that is fantastic and sets your bag apart from the rest!
This one is made with clear resin and candy sprinkles, the perfect combination--even better to embed a name in it with letter beads.
-min.JPG)
How to Make Glitter Resin Keychains!
Make gorgeous glitter resin keychains with power words as the perfect handmade gift. These glitter keychains are a great resin project for beginners.
Learn to make glitter resin keychains with power words using EasyCast Resin, letter beads, tassels and keychain hardware.

How to Make an Epoxy Resin Glitter Lucky Keychain!
This cute and glittery resin keychain is the perfect pinch-proof accessory for St. Patrick's day, or year round to make those keys unique.
Make a lucky glitter resin keychain quickly using EasyCast resin, sparkly glitter and some keychain hardware. This fun project comes together in a couple days--so start now!
This beautiful keychain is the perfect spin off the friendship bracelets and uses the same letter beads--makes a great gift too!

Nuka Cola Quantum Resin Keychain
Crafting the Apocalypse has become my newest obsession--I'm thinking of new Fallout crafts to make every day.
Hopefully there's other Fallout nerds out there to appreciate these--or at least this can give you an idea on how to cast an object in mold making resin and duplicating it in resin.
Let's make a DIY Fallout 76 Nuka Quantum Resin Keychain with mica powder and resin...and a little acrylic paint on the top of the resin cap.
-min.jpg "Let's make a DIY Fallout 76 Nuka Quantum Resin Keychain!")
Lucky 4-Leaf Clover Shamrock Resin Keychain DIY!
Make lucky and festive 4-leaf clover resin keychains with clear resin, perfect for St. Patricks day!
Hook them on a zipper, bag, coat or on keys for a little extra luck in your day.
Great way to preserve that little lucky keepsake...whether you find one yourself or order one online.
-min.JPG "Make lucky and festive 4-leaf clover keychains with resin, perfect for St. Patricks day! Hook them on a zipper, bag, coat or on keys for a little extra luck in your day. Great way to preserve that little lucky keepsake...whether you find one yourself or order one online.")
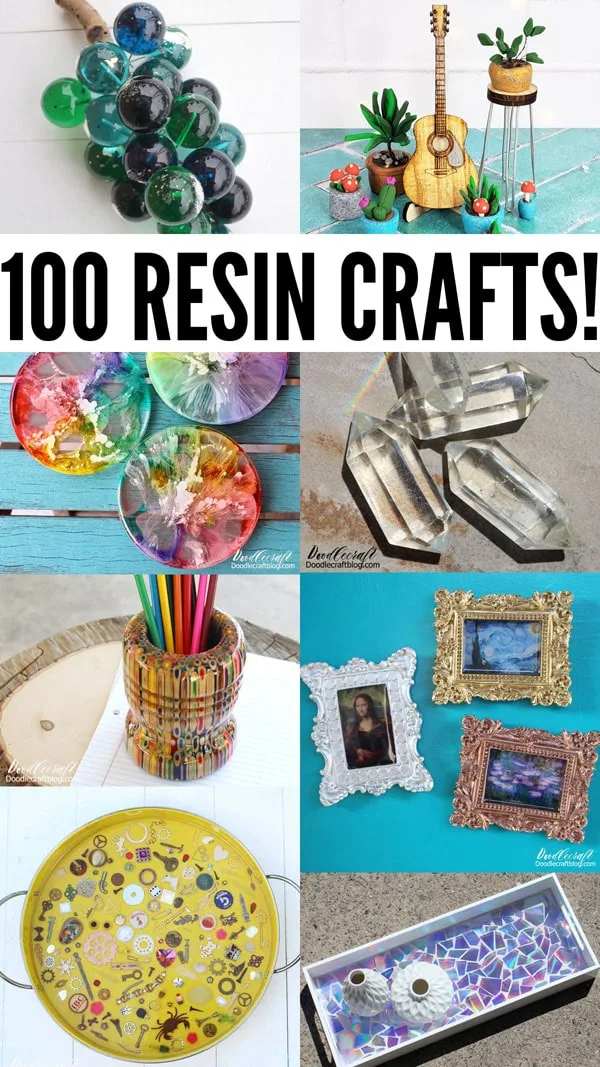
100 DIY Resin Crafts Projects Ideas! (Beginner and up)
I've worked with resin for years and so if you do a quick google search for "resin crafts", chances are, you've seen a lot of my work.
There's a huge variety of resin products out there, so there are some things you should know.
Resin is magic. Okay, there's some science to it, but it basically is polymers that make a hard, durable plastic.
There are different resins for different applications. There are deep cast resin, high gloss resin finishes, UV resins, resin clay, mold making, and more. I'll go into all the details of which resin to use for which project at this resin crafts post.
If it's your first time working with resin, I have a bunch (100+) of projects that are all really beginner friendly, simple projects and using different types of resin--and I've got step-by-step guides for all of them!


-min.jpg)


Comments