
-min.jpg "How to Make Origami Corner Bookmarks")
How to Make Origami Corner Bookmarks (Easy Paper DIY)
Origami paper corner bookmarks are super easy to make and perfect for teaching a large group.
Just a few easy steps and folding to make a little DIY origami corner bookmark to keep track of reading all during the school year.
These easy corner bookmarks are a perfect gift, easy crafts for a school class or youth group, and all you need are some squares of paper.
-min.jpg "How to Make Origami Corner Bookmarks")
What is a Corner Bookmark?
Easy origami corner bookmarks fit on the right corner of a good book.
The folded edge of the triangle slides over the corner of your page keeping track of your place in the book.
Origami is an easy, glue/adhesive free way of making a corner bookmark, but they could also be decorated to make little monster corner bookmarks or other fun corner bookmark ideas.
-min.jpg "How to Make Origami Corner Bookmarks")
Supplies Needed for Origami Corner Bookmark:
- Origami Paper (6x6" paper squares)
- Bamboo Scoring Tool (optional)
Let's talk about the kind of paper for DIY bookmarks. Origami paper is the best thing because of the thinner paper.
Construction paper, coloring pages and scrapbook paper can make cute corner bookmarks, but are much bulkier in the book.
Whatever you decide, you'll need one square sheet of paper for each of the cute bookmarks.
-min.jpg "How to Make Origami Corner Bookmarks")
Step 1: Fold Origami Paper
Pick out a piece of origami paper, essentially any square piece of paper will work.
Origami paper is the best paper to use because it is a little thinner than copy paper...you can try other weights of paper, just cut into small squares, six inches.
Begin by folding the origami paper in half from corner to corner with the colorful side of the paper facing out.
Then use the bamboo scoring tool to crease the fold firmly from the top point to the bottom point, creating a triangle shape.
-min.jpg "How to Make Origami Corner Bookmarks")
Step 2: Repeat
Then open up the origami paper and fold in half the opposite way from corner to corner and crease it firmly.
-min.jpg "How to Make Origami Corner Bookmarks")
Step 3: Fold Top Down
Now fold the top of the triangle down, just the top layer of paper, to meet the bottom crease line, creating a smaller, white triangle on top.
It looks like the Tri-Force from Legend of Zelda with 4 little triangles!
-min.jpg "How to Make Origami Corner Bookmarks")
Step 4: Side Folds
Now fold the edge of the triangle up to meet the center points of the triangle, lining up with the folded line from the beginning fold.
-min.jpg "How to Make Origami Corner Bookmarks")
Then repeat on the other side of the triangle, folding the side point up to meet the center points, creating a square shape.
-min.jpg "How to Make Origami Corner Bookmarks")
Step 5: Tuck and Fold
Now take those freshly folded points and fold them down inside the pouch of the triangle.
This can be a little bit tricky, depending on the age group, but the point of the flap goes from the top of the square shape to the exact opposite side, the bottom corner point.
-min.jpg "How to Make Origami Corner Bookmarks")
Repeat with the other point, tucking and folding it inside the little pocket we created in our own bookmark.
-min.jpg "How to Make Origami Corner Bookmarks")
That's all it takes to make the basic origami bookmark!
The easy DIY corner bookmarks are done--ready for all book lovers to mark their place in their favorite book.
The right side of the origami paper shows on both sides of the page, while the wrong sides of the paper fits snuggly against the book page.
Doing a basic corner bookmark is a great way to teach kids paper folding skills--no glue stick needed!
-min.jpg "How to Make Origami Corner Bookmarks")
How to Sew a Fabric Corner Bookmark!
If you love making handmade bookmark, try a fabric corner for your next bookmark!
Consider doing an easy sewing project of a quick fabric corner bookmark with a simple design.
You'll need a sewing machine, 3 six inch fabric squares (great way to use those fabric scraps), and an optional turning tool.
If you are familiar with sewing, you'll put one fabric square right side up on the table. Then fold the second fabric square into a triangle, with the right sides out, and place it on the top corner of the fabric stack. Finally, place the last piece of fabric on top, with the right side facing down on the stack.
Pin it all together, leaving a one inch section that you will not sew, so you can turn it out.
Then top stitch all around the stack of squares, leaving the one inch opening.
Then turn it all right side out, iron it flat--especially in the corners of the bookmark, and then stitch up the one inch opening.
Then you have fabric bookmarks that are a great gift idea, perfect first sewing class, or a fun way to use up fabric scraps.
I'll have to do a video tutorial and post on fabric bookmark corners soon!
-min.jpg "How to Make Origami Corner Bookmarks")
Once you figure out the origami folding and make a few lovely bookmarks, you can think of other creative ideas, new designs and make all kinds of bookmark corners.
Use a glue stick and add some paper triangles sticking out of the triangle pocket for teeth, one or three little paper eyes glued on the top of your triangle for the cutest monster bookmarks.
Lots of fun ways to create the perfect corner bookmarks.
That's it!
Learn how easy it is to fold an origami corner bookmark, perfect for an avid reader to keep track of their place in their latest read.
Just a single piece of paper and six folds of the paper is all it takes to create the perfect handmade bookmarks.
Great for handmade gifts, school or youth group craft time or just to keep the current book marked.
Like, Pin and Save!
-min.jpg "How to Make Origami Corner Bookmarks")
Here's some other easy Bookmarks to Make today!
Which of these bookmarks is your favorite?
How to Make Pressed Flower Laminated Bookmarks DIY
Preserve gorgeous pressed flowers in lamination for the perfect and easy bookmark!
These flowers and four leaf clovers were found in my yard and perfect for an epic book place holder.
Just a few supplies needed to make all the flower art bookmarks!
-min.jpg "Preserve gorgeous pressed flowers in lamination for the perfect and easy bookmark! These flowers and four leaf clovers were found in my yard and perfect for an epic book place holder. Just a few supplies needed to make all the flower art bookmarks!")
How to Make Watercolor Bookmarks (Beginners Tutorial)
Learn how to paint watercolor bookmarks easily for the the perfect diy bookmark.
These make a great gift in addition to a favorite book!
Let me show you how to create these awesome watercolor effects effortlessly!
-min.jpg)
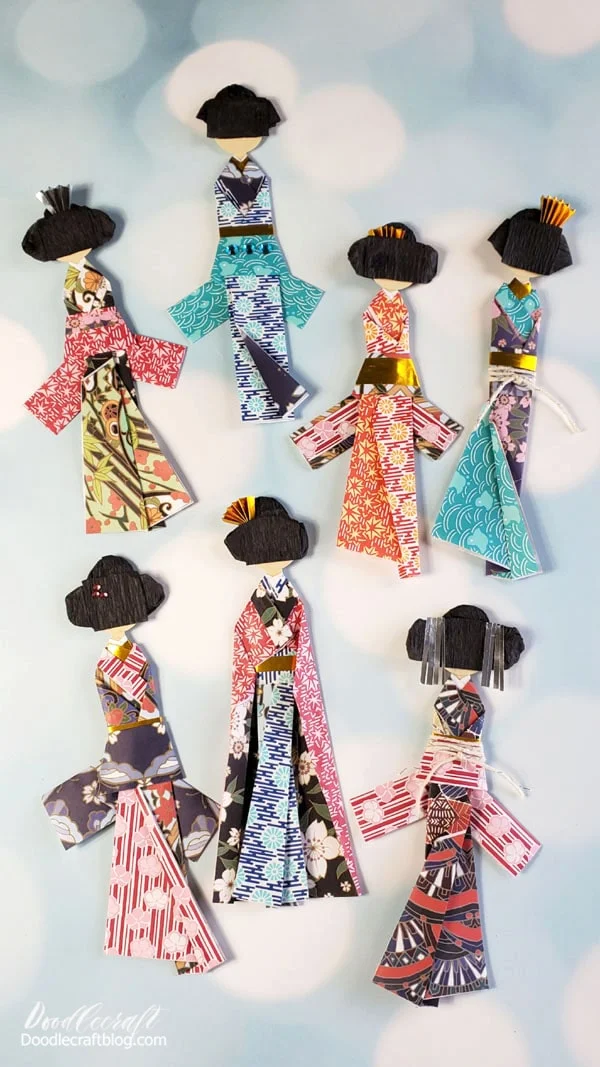
Japanese Paper Doll Bookmarks
Learn how to make Japanese Paper Dolls with origami paper.
These adorable layered geisha girls are the perfect handmade gift tags, bookmarks or even wall art.
It's not an origami bookmark (paper folding with no glue), but use the vibrant shades and different colors of origami paper to capture the traditional origami vibe...as a paper doll--that makes the perfect bookmark!
-min.jpg)
Butterfly Bookmark DIY
Learn how to make a folded butterfly, heart or flower bookmarks using a few simple supplies.
Attention book lovers, make the perfect bookmark for keeping track of your page as well as looking beautiful for Spring!
-min.jpg)
Make an Engraved Bookmark with xTool!
Learn how easy it is to make an engraved wood bookmark with the xTool M1 laser cutting machine.
This fun engraved bookmark--different projects great for older kids--would make a great handmade gift, decoration piece or used as a gift tag!
The visual appeal of engraved wood has endless possibilities!
This would make a great Father's day gift too--for a man that loves a fabulous reading experience.
-min.jpg)
Paperclip Bookmarks Made with FastCast Resin
Make a darling bookmark with a paper clip and some regal resin shapes painted with metallic paints.
This is a perfect craft for a book club, quick gift for a family member or just for fun.
Create the perfect paperclip bookmark with FastCast resin, metallic paint and a little twine.

Craft Foam Bookmarks made with Cricut Maker Knife Blade
The Cricut Maker 3 is so versatile and has an array of adaptive tools that make every project a cinch!
I am in love with the Cricut Knife Blade and its many uses.
The knife blade can cut various shapes and materials: leather, basswood, balsa wood, chipboard, matte board, faux leather and craft foam.
This craft foam bookmark is so quick and perfect for a first try at the Cricut Knife Blade.

Book Lover Quotes FREE Bookmark Printable
Bookmarks for the Book Worm! These 6 homemade bookmarks are brush lettered book lover quotes.
Anyone with a love of books will appreciate the quotes on these bookmark designs.
This is an easy way to make a beautiful bookmark--just a high quality print on card stock and lamination for a long lasting bookmark.

Ribbon and Button Bookmarks!
Ribbon and Button Bookmarks!
This is such a fun and simple craft, elastic bookmarks fit all sizes of books an make really cute bookmarks.
It is an easy project and perfect for youth to learn how to sew on a button--let them pick their color scheme and they'll be a big hit.
I taught a group of 20 tweens how to put these together--excellent for those fine motor skills.
You will need Ribbon, Buttons, hair elastic and needle/thread--and sewing machine.
.JPG)


-min.jpg)


Comments