
-min.jpg)
How to Make Pressed Flower Laminated Bookmarks DIY
Preserve gorgeous pressed flowers in lamination for the perfect and easy bookmark!
These flowers and four leaf clovers were found in my yard and perfect for an epic book place holder.
Just a few supplies needed to make all the flower art bookmarks perfect for book lovers!
**TIP: When you go on vacation or out of town, snag a few flowers or fern leaves from parks or the botanical gardens and press them in a book to turn into the perfect holiday keepsakes after your trip! (protect your pages with a piece of folded parchment paper.)
-min.jpg)
Supplies Needed for Pressed Flowers Laminated Bookmarks:
- Pressed Flowers (This kit from Ditsy Flowers is what I am using--not an affiliate)
- Own Flowers
- Heat Laminator and Sleeves
- Scissors
- Paper Cutter
- Hole Punch
- Tassels (this 100 pack is awesome!)
Step 1: Laminating Pouches
Begin by plugging in the laminating machine and letting it heat up while working with the pressed flowers.
Next step is simply removing one laminating sleeve from the box or package.
Open it up and lay it on a flat surface so it can be filled with flower art.
This is a fun DIY project that I did when I was a young girl (although I used contact paper instead because I didn't have a laminator until my 30th birthday) and it's so fun to revitalize these first time crafts.
I like using the clear lamination pouches because I can see the front and back of the flowers. You can take flowers and paint a thin layer of Mod Podge on them and place them on craft paper. Then cut the paper into bookmark strips and laminate them.
-min.jpg)
Step 2: Pressed Flower Art
Now take your pressed flowers from the Ditsy Flowers press and arrange the flowers on the laminating pouch in a pattern you love...you can get very creative with the floral arrangements for your pressed flower bookmark.
I kept mine in a line, so the bookmark would be a normal bookmark size, but otherwise there are no rules. The laminating pouch is large enough to make about 3 floral bookmarks at a time.
Be as creative as your heart will allow!
**Have you pressed flowers before? You can use a heavy book or a wooden flower press. I love my Ditsy Flowers press and have a full post on it here.
-min.jpg)
Step 3: Heat Lamination
After arranging the flowers, fold the lamination pouch back down on itself. (important details if you haven't used a lamination pouch before)
Then carefully feed it through the laminator, the laminating pouch does a good job of keeping things mostly in place because of its texture, just lift it gently so it doesn't shuffle around!
The lamination pouch just slides through the machine at the perfect speed to melt the 2 layers of the pouch together!
-min.jpg)
Step 4: Trim Bookmark
Use the paper cutter to cut the laminated sheet down to the perfect desired bookmark size.
I like having some small bookmarks and some large ones on hand, depending on the books I'm reading or wanting to mark.
-min.jpg)
Step 5: Round Corners
Finally, use scissors to round the corners of the laminated bookmark to make it smooth on the ends.
This is a key step for a great bookmark...those rounded corners would make the scribes of the medieval days drooling. (okay, they'd probably like a closer look at those scissors too!)
Then punch a hole in the top of the bookmark and larks head loop a tassel on the top of the bookmark for the perfect, classy, finishing touch!
-min.jpg)
That's it!
Happy Crafting! Hope you are confident now to create pressed floral art and preserve it in lamination for a bookmark of the most classy proportions.
I like to think that Shakespeare is pretty happy about these dried flowers and transparent bookmarks to showcase the pages of a book!
Press your own flowers and make them into beautiful bookmarks to enjoy year round--flower crafts are awesome and don't take lots of times!
Flower bookmarks make a great homemade gift, or for special events, they are an affordable craft and perfect gift to help encase the beauty of nature in pretty bookmarks.
Save your own fresh flowers or flower gifts and turn them into laminated works of art in a protective plastic sleeve, great alternative to dried flowers.
Like, Pin and Save!
-min.jpg)
How to Press Flowers (20 Ways to Use a Pressed Flower)
Learn how to press flowers with a simple wooden flower press from Ditsy Flowers.
Plus three fun tutorials on what to do with the finished pressed flowers and making them into flower art!
Pressing flowers is a great way to preserve a dainty and fragile part of nature and make it last forever...or very nearly.
-min.jpg)
Here's some more fun bookmark ideas too!
How to Make Watercolor Bookmarks (Beginners Tutorial)
Learn how to paint watercolor bookmarks easily for the the perfect diy bookmark.
These make a great gift in addition to a favorite book!
Let me show you how to create these awesome watercolor effects effortlessly!
-min.jpg)
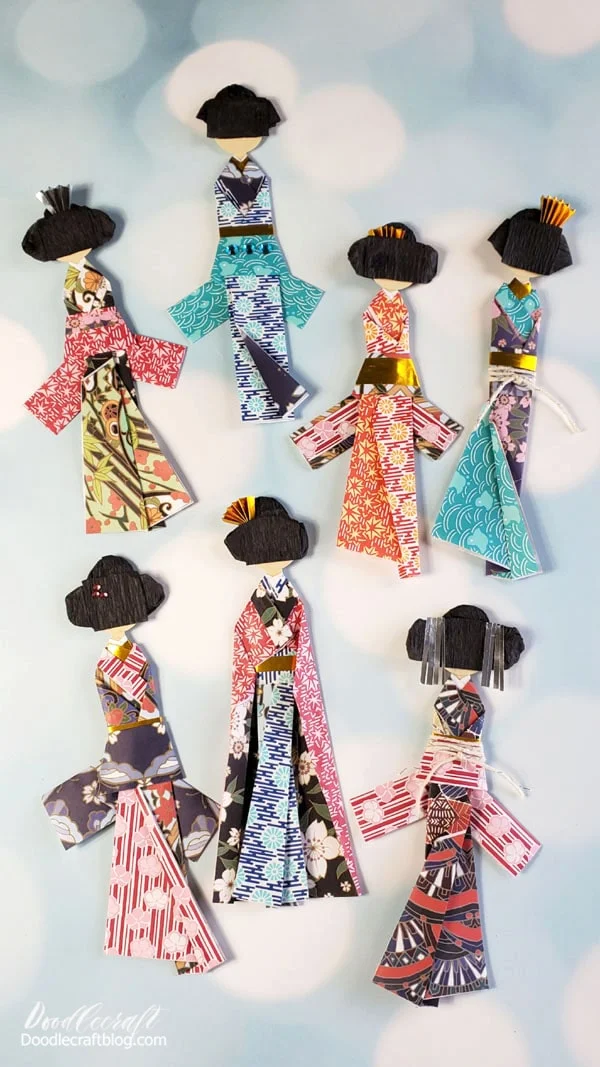
Japanese Paper Doll Bookmarks
Learn how to make Japanese Paper Dolls with origami paper.
These adorable layered geisha girls are the perfect handmade gift tags, bookmarks or even wall art.
It's not an origami bookmark (paper folding with no glue), but use the vibrant shades and different colors of origami paper to capture the traditional origami vibe...as a paper doll--that makes the perfect bookmark!
-min.jpg)
Butterfly Bookmark DIY
Learn how to make a folded butterfly, heart or flower bookmarks using a few simple supplies.
Attention book lovers, make the perfect bookmark for keeping track of your page as well as looking beautiful for Spring!
-min.jpg)
Make an Engraved Bookmark with xTool!
Learn how easy it is to make an engraved wood bookmark with the xTool M1 laser cutting machine.
This fun engraved bookmark--different projects great for older kids--would make a great handmade gift, decoration piece or used as a gift tag!
The visual appeal of engraved wood has endless possibilities!
This would make a great Father's day gift too--for a man that loves a fabulous reading experience.
-min.jpg)
Paperclip Bookmarks Made with FastCast Resin
Make a darling bookmark with a paper clip and some regal resin shapes painted with metallic paints.
This is a perfect craft for a book club, quick gift for a family member or just for fun.
Create the perfect paperclip bookmark with FastCast resin, metallic paint and a little twine.

Craft Foam Bookmarks made with Cricut Maker Knife Blade
The Cricut Maker 3 is so versatile and has an array of adaptive tools that make every project a cinch!
I am in love with the Cricut Knife Blade and its many uses.
The knife blade can cut various shapes and materials: leather, basswood, balsa wood, chipboard, matte board, faux leather and craft foam.
This craft foam bookmark is so quick and perfect for a first try at the Cricut Knife Blade.

Bookmarks with Laura Kelly Sprinkle Kindness Stamps!
I love rubber stamping and I love papercrafts. Laura Kelly released these cute stamps with heartfelt messages; perfect for gift tags, handmade cards, bookmarks and more!
The foil paper works with the toner paper using a heat laminator and could not be more fun--but scrapbook paper works too!
This is the perfect way to share a little extra love--the whole bookmark is just beaming!
Just add a hole with a hole punch and some twine for the perfect fringe tassel.

Book Lover Quotes FREE Bookmark Printable
Bookmarks for the Book Worm! These 6 homemade bookmarks are brush lettered book lover quotes.
Anyone with a love of books will appreciate the quotes on these bookmark designs.
This is an easy way to make a beautiful bookmark--just a high quality print on card stock and lamination for a long lasting bookmark.

Ribbon and Button Bookmarks!
Ribbon and Button Bookmarks!
This is such a fun and simple craft, elastic bookmarks fit all sizes of books an make really cute bookmarks.
It is an easy project and perfect for youth to learn how to sew on a button--let them pick their color scheme and they'll be a big hit.
I taught a group of 20 tweens how to put these together--excellent for those fine motor skills.
You will need Ribbon, Buttons, hair elastic and needle/thread--and sewing machine.
.JPG)
Vintage Style Gold Tassel Ribbon Bookmark!
No book place holder is quite as fancy as this pretty bookmark with Parisian vibe ribbon.
With a gold tassel and electroplated shimmery beads--it's a crowd pleaser and a great way to make the perfect gift for Mother's day.
Ribbon bookmarks are great for handmade gifts, leaving on a decorative book, using it for actually book place marking or just for fun!
-min.JPG)
David Tennant Peeking Time Lord Bookmark
If you are a fan of Doctor Who, you'll know that David Tennant is the most iconic and loveable!
This little clip of him peeking over the office cubical in "Partners in Crime" is perfection--he belongs in a good book!
Free printable bookmark templates to make a bunch of your own--they'll definitely leave a lasting impression--great for geeky gifts, library crafts and Fan Con freebies!
(this post is from 2014 and it still gets LOTS of love!)
-min.JPG)
Washi Tape Bookmarks!
Super short tutorial for making a washi tape bookmark!
This fun post is from 2013, so I was pretty new to blogging and things have changed a lot since then!
Check it out:
Paintchip Bookmarks!
Paint Chips are awesome for bookmarks and just need a little decorating.
This absolutely fun post was done in 2012 when blogging was WAY different...so the pictures are teensy and the text is short.
I used rubber stamps and stamped images on white cardstock and then let my kids color the designs.
We cut the images out and glued them to paint chip cards...and added some twine for a tassel.


-min.jpg)


Comments