
-min.jpg "How to Make Nursery Name Sign (Custom DIY with xTool)")
How to Make Nursery Name Sign (Custom DIY with xTool)
Learn how to make a gorgeous nursery name sign for a new bundle of joy!
Make a name sign for any occasion, not just a new baby...change the text for a wedding, family name or with a fun saying.
This wood sign is perfect for customizing with a first and middle name, and looks great as home decor.
-min.jpg "How to Make Nursery Name Sign (Custom DIY with xTool)")
Supplies Needed to Make a Laser Cut Nursery Name Sign:
- xTool S1 20 W
- Wood Circle Pallet (12 inch)
- 3mm Basswood
- Flower Nursery Sign File
- Acrylic Craft Paint
- Metallic Rose Gold Paint
- Paint Brushes
- Hot Glue Gun or Wood Glue
-min.jpg "How to Make Nursery Name Sign (Custom DIY with xTool)")
How to Get Laser Cut Files:
Creative Fabrica is a great resource for template files.
I just purchased a one-year plan, and it comes with unlimited downloads. Granted, there are a bunch of AI generated images that do not thrill me...but the reason I decided to pay the $49 for the year was for the laser cut files.
No adobe illustrator or other graphic design programs needed, I can just download any laser-cut file and load it right into xTool Creative Space and it's ready to go.
You can get 10 free download files as a free trial. I got 10 free DXF files and then decided it was worth it to get a year subscription...which I immediately bought and canceled so I can redecide next year. (files come in all file formats)
You can subscribe and pay per month, or pay for the year. Note: if you do pay for a year, they will give you an option of paying for another year at a lower price immediately. You can purchase images by the single image, but it's not as cost effective.
Okay, these are affiliate links for Creative Fabrica, I get store credit or a small percentage if you make a purchase.
If you are running a Laser Cutting Business, I highly recommend like Creative Fabrica a site to get tried and true, tested, laser cut files that fit together perfectly...and MOST of their files come with a commercial license, so you can make things to sell!
Let me show you a few favorite files:
- wooden bench
- wooden easel stand
- wooden bicycle
- puzzle animals
- living hinge patterns
- wooden clutch bag
- wooden desk organizer
- wooden hair comb
- wooden jewelry box
- wooden money envelope
- wooden night lights
- wooden notebook
- wooden plant stand
- wooden step display stand
- British phone booth
- wooden docking station
- wooden doll cradle miniature
- decorative basket
- wooden glasses holder
- wooden medals
- wooden owl decor
- wooden wall clock
- wooden toy airplane
- wooden toy trucks
- Santa sleigh templates
-min.jpg "How to Make Nursery Name Sign (Custom DIY with xTool)")
Step 1: Laser Cut Settings
Begin by importing the file into xTool Creative Space (XCS), then edit the text with your custom name, making sure the name size fits on the pallet, the file has everything ready to go!
I did the first name in the bold font and the middle name in the stylized font...this will help the child learn to spell their own first name as they age. (I had a nursery sign when I was a child and that's how I learned to spell my name.)
Then place the 12x12 3mm basswood in the xTool and select the size.
Then adjust the images to fit on the 12x12 pallet and arrange them on the basswood to use the most efficient amount of space.
Then have the xTool cut out the basswood, typically my settings are the standard for basswood.
-min.jpg "How to Make Nursery Name Sign (Custom DIY with xTool)")
Step 2: Painting Wood Letters and Flowers
After laser cutting the wood, it is ready to paint.
Pick the colors of acrylic craft paint you are excited about, the colors that match the home decor or the little girl room.
The first thing is to paint the palette, you can have a laser cutter cut out the palette background as well, but I am using this pre-made one from Plaid. (Get the circle backer here for $4)
It's sturdy and has the hanging hardware built-in.
This could also be sold as a round wood name sign kit and the customer could paint and assemble it themselves.
-min.jpg "How to Make Nursery Name Sign (Custom DIY with xTool)")
I used Brushed Metal Rose Gold Metallic acrylic paint and a small paint brush to paint the top surface of the shapes of the flowers and the letters of the name.
-min.jpg "How to Make Nursery Name Sign (Custom DIY with xTool)")
If your name has a big number of letters, this process can take a long time.
Just paint the surface carefully, I left the dark edge because I love it.
The outlines of the flowers and the delicate letters are fragile, so paint them with care.
-min.jpg "How to Make Nursery Name Sign (Custom DIY with xTool)")
Line up the outline of the flowers on the base of the flowers and see or mark with pencil where the paint colors need to change for the different colors.
Or leave the flowers natural wood or stain or paint them all the same color.
I love the bright colors under the rose gold!
-min.jpg "How to Make Nursery Name Sign (Custom DIY with xTool)")
Step 3: Paint the Pallet Background
For the background of the wooden name sign, I picked blush, which is very nearly close to the natural wood finish anyway.
Use a wide flat brush or even a foam brush to paint the full background.
-min.jpg "How to Make Nursery Name Sign (Custom DIY with xTool)")
Step 4: Glue the Wood Pieces to the Pallet
Finally, after the paint has all dried, use wood glue or a hot glue gun to adhere the letters and flowers to the wood pallet sign.
Letters and flowers would also look fabulous glued on a wood slice for a very different look and a unique touch!
-min.jpg "How to Make Nursery Name Sign (Custom DIY with xTool)")
Line up all the wood cutouts on the background before gluing to make sure you know where everything should go.
Mark with a pencil, or just add glue and "eyeball" it.
I started gluing the name first, lined up with the lines of the pallet for straightness.
-min.jpg "How to Make Nursery Name Sign (Custom DIY with xTool)")
It's a little more finicky when gluing the flower outlines, since the lines are so thin.
Use caution so you don't break it while gluing and try to add a bead of glue over the main parts of the flower outline, especially all around the border.
-min.jpg "How to Make Nursery Name Sign (Custom DIY with xTool)")
Now the beautiful name sign is ready to hang in baby’s room or the kids room!
I love how it looks with the pastels, natural blush and the rose gold.
This is really such an easy baby name sign to make if you have a laser cutter, which is totally worth the investment, in my opinion.
The price of the laser cutter I have now is nearly 1/2 the price it was when it was released a year ago and it is still cutting edge.
I highly recommend an xTool laser cutter, so you can make baby's nursery name signs for everyone you know...baby shower gifts and more!
-min.jpg "How to Make Nursery Name Sign (Custom DIY with xTool)")
The file is easy to use and doesn't take adobe illustrator to design yourself--I love how easy it is to get really high quality files for free or nearly.
Customize the file right in xTool's software easily just change the name and alter the size if needed.
You'll be thrilled at how easy it is to create this gorgeous piece of home decor with hardly any time needed!
-min.jpg "How to Make Nursery Name Sign (Custom DIY with xTool)")
That's it!
Hope you love how adorable and charming this baby nursery name sign turned out.
There are so many great occasions to make a sign for...nurseries, weddings, and custom home decor.
What name will you make one for?
What colors will you paint yours?
If you make one, share it on social media and tag me @doodlecraft so I can see and cheer you on!
Like, Pin and Share!
Here's a bunch of other xTool Crafts to make!
How to Engrave Stainless Steel with 2W IR Laser DIY
Turn a love letter signature into a heirloom keepsake!
Learn how to engrave stainless steel pendants with the xTool S1 2W infrared laser.
Think of all the handmade and personalized gifts you can make with this amazing technique!
These are gorgeously engraved permanent marks and will not wipe off...turn your handwriting into a treasure.
-min.jpg)
How to Laser Engrave Journals DIY with xTool S1
Learn how easy it is to make a laser engraved journal or notebook with xTool laser cutting machine.
Every time I do a laser cutting project it becomes my absolute favorite--and this is no exception, I totally love these faux leather engraved journals!
Engraving on journals is so fast, just minutes, and makes a gorgeous handmade gift, branded business merchandise or custom swag.
-min.jpg "Supplies Needed for Laser Engrave Journals: affiliate links: OtterBlotter Hardcover Lined Journal Notebook xTool S1 diode laser (or other laser engraving machine) xTool Creative Space Image to engrave")
Make a Laser Cut Earring Holder DIY with xTool S1
Learn how to make a gorgeous DIY earring display perfect for keeping track of earrings or for displaying earrings for sale at an event!
If you have a big earring collection there are so many wonderful earring stand options--even combining with jewelry organizer solutions too!
-min.jpg "Learn how to make a gorgeous DIY earring display perfect for keeping track of earrings or for displaying earrings for sale at an event!")
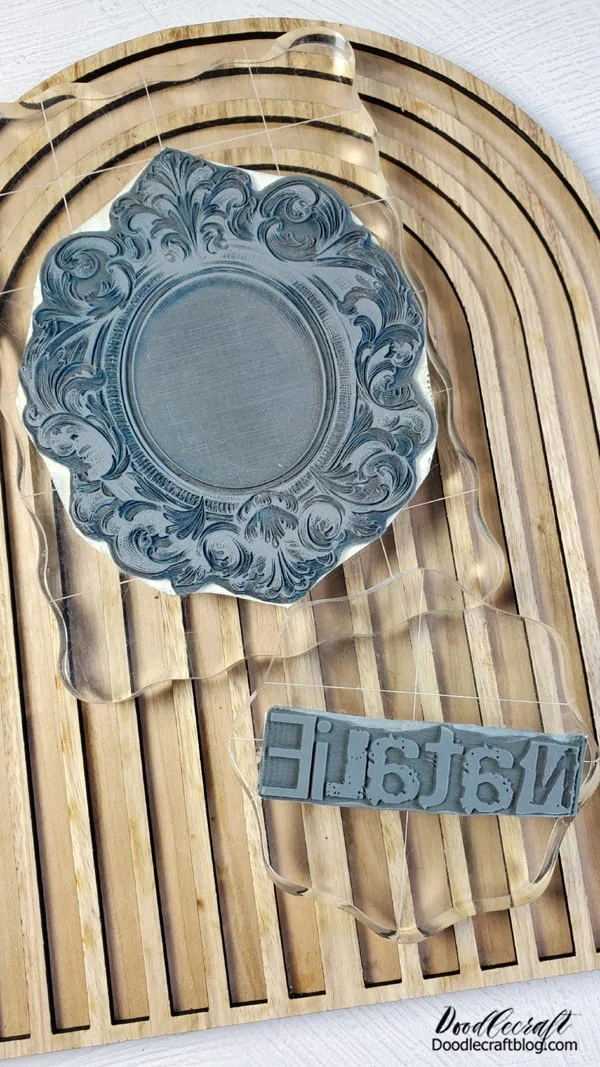
How to Make Rubber Stamps with xTool S1 Laser Cutter
Learn how to make your own custom rubber stamps with the xTool S1 Laser cutting and laser engraving machine!
I am absolutely addicted to making rubber stamps now and you will be too--they are super intricate and detailed, I'm in love!
-min.jpg)
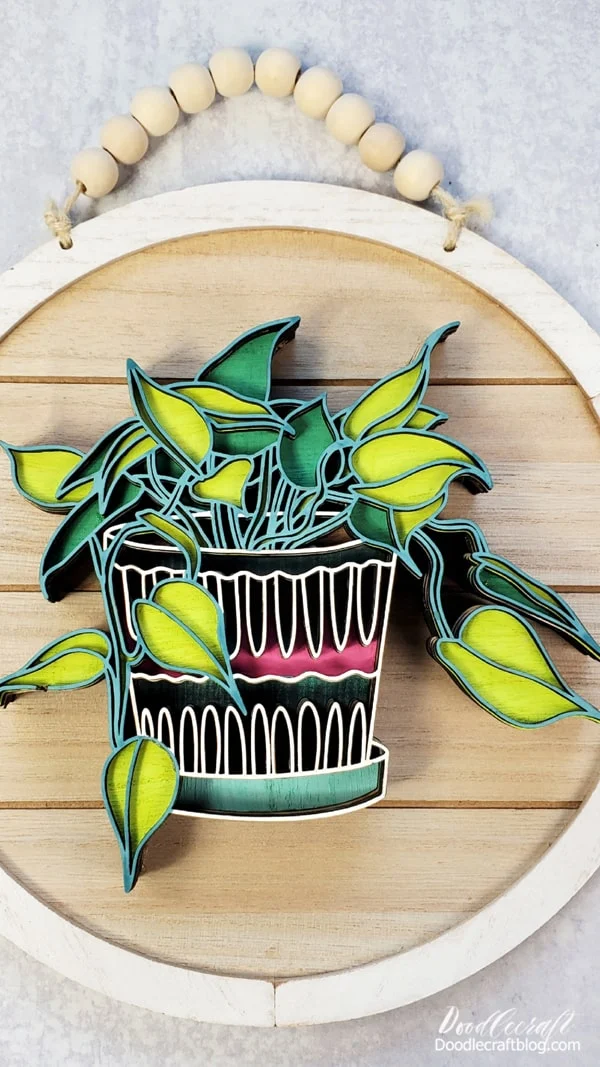
Layered Laser Cut Wood Sign with Tooli-Art Paint Pens
Layered laser cut wood signs are beautiful, fun to make, and totally the thing right now!
The intricate cuts of a laser cutter make it possible to stack very delicate layers into a work of art easily and making it not quite so delicate.
The depth, texture and colors make this little planter sign so intriguing!
-min.jpg "Layered Laser Cut Wood Sign with Tooli-Art Paint Pens")
Learn how to make stunning leather bracelets with the xTool Laser Cutting machine.
It's easy to make laser cut leather bracelet and makes a meaningful gift for a special occasion!
These wrap-around wrist bracelets are easy to make and secure with a stud rivet...they are adjustable in size, can be customized and only take 3 supplies!
-min.jpg "Learn how to make stunning leather bracelets with the xTool Laser Cutting machine. It's easy to make laser cut leather bracelet and makes a meaningful gift for a special occasion! These wrap-around wrist bracelets are easy to make and secure with a stud rivet...they are adjustable in size, can be customized and only take 3 supplies!")
DIY Laser Engraving a Mirror with xTool S1 20W Diode
Engrave a mirror with the xTool S1 Laser Cutting machine for a gorgeous statement piece of home decor.
Add an inspirational message or family motto on a mirror with glass laser engraving!
The possibilities with the xTool electronic products are endless!
-min.jpg "Add an inspirational message or family motto on a mirror with glass laser engraving!")
Harry Potter Deathly Hallows Wedding Cake Topper DIY
If you are planning a Harry Potter themed wedding, event, birthday party or special occasions, this Deathly Hallows cake topper is the icing on the cake.
I'm sharing these 2 different cake toppers, free downloads at the end of the post, as an inexpensive way to do cake decorations with a high quality professional look.
-min.jpg "Here's the second: Always deathly hallows topper with peonies on the side.")
Acrylic Monstera Leaf Earrings
Cut acrylic with a diode laser and make earrings!
Diode lasers can cut cast acrylic in specific colors...not clear, white or blues.
Black acrylic cuts best--so smooth and dreamy!
-min.jpg)


-min.jpg)


Comments