DIY Screen Printing Holiday Cards (Make with xTool)
Learn how to make a bunch of cards easily using xTool Screen Printing system.
Silk screening on paper is easy, inexpensive and a great way to mass produce handmade cards.
The silk screen paint is slightly raised, giving the cards a wonderful texture.
Great way to make a bunch of holiday or Christmas cards, or generic cards that can be giving as thank you's or neighbor and friend gifts!
Learn how to use the screen printing process to make your own Christmas cards or greeting cards!
Sending cards is common this special time of year and adding family photos for all your loved ones to enjoy! I've seen people hang the cards they receive on the back of the front door, on their fridge and even on the Christmas tree!
Create your own card design and use the xTool Screen Printing Kit to mass produce them!
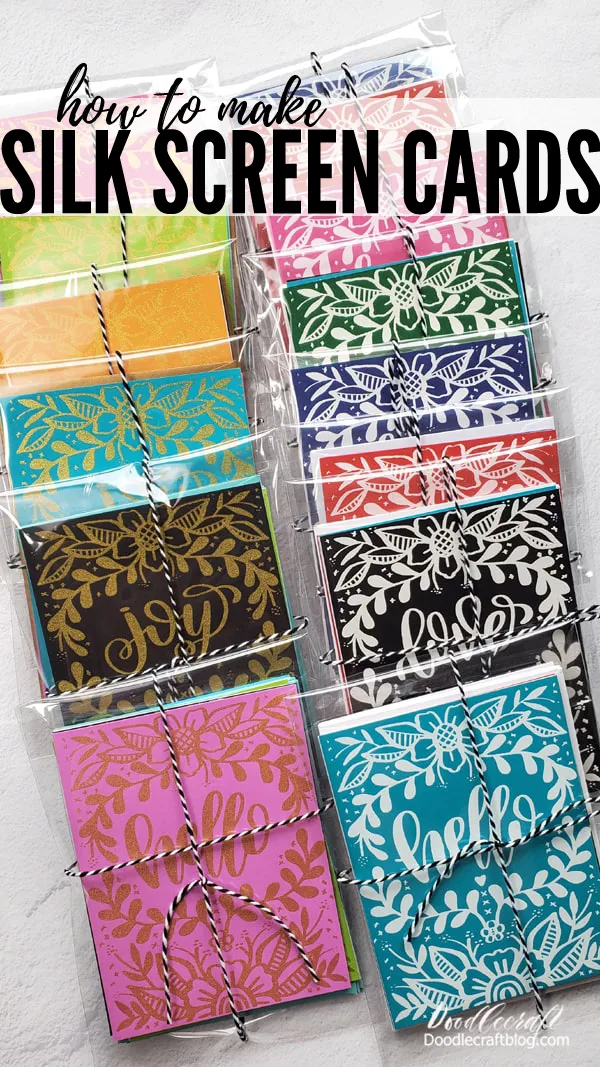
I'm making generic blank greeting cards...a thank you, hello, joy and love.
Great for holiday greetings but these packages of blank cards also make great handmade gifts for friends and neighbors.
I'll be passing these out this year with a tag that says "Wishing you many happy occasions in 2025".
Supplies Needed for Screen Printed Cards:
- xTool S1 Laser Cutting Machine
- xTool Screen Printing Kit (Contains 4 frames, 12 screens, 11 inks and a few other supplies)
- Colored Cardstock
- White Cardstock
- Paper Cutter
- A2 Envelopes
- Double Sided Adhesive Tape
- 5X7 Cellophane Sleeves
- Black and White Bakers Twine
The xTool Multi-color Screen Printing kit comes with everything you need to do full color screen prints.
The squeegee, the inks, everything is included. The screens are 100 mesh--like typical art screens, and covered with emulsion already that are ready to laser engrave.
You will need a laser cutter, xTool S1 is compatible with the screen printing kit.
There is a basic kit (slightly smaller screens) that work with the M1 series.
Step 1: Design and Laser Image
Begin by designing an image the size of a full sheet of paper, they can be intricate and detailed or simple designs.
I used my ipad and procreate app to make the image I used. (If you want the image, I'm happy to share, just email me at maildoodlecraft @ gmail . com)
Design your screen printing image and import it into xTool Creative Space, edit it to fit the size of your screen. If it's your first time to screen print, start with just one color images.
xTool Software has a lot of stock images and fonts with loads of customization options, so you can design your holiday cards right in XCS.
THEN BE SURE TO MIRROR THE IMAGE SINCE IT WILL ENGRAVE THE BACK OF THE SCREEN.
Select the laser type as "Screen Printing" and select the material as "Mesh Screen", then auto adjust the distance (or set it to 0.718).
The xTool will set the auto engraving settings after selecting the material.
Then send the image to the machine.
It takes a bit longer to process, and then the laser begins engraving the layer of emulsion off the screen. Again, it's a lengthy process to engrave.
It's beautiful and precise, leaving immaculate details...and a bit smelly, so make sure it is venting out a window.
The engraving process takes a very long time, so stay close and be patient.
This screen design is made to fit a sheet of paper perfectly and took an hour or so to burn.
It's worth the time for the detail and intricate design that can be achieved.
Now the screen can be used for as many projects as you want.
I did nearly 100 passes on pieces of paper with this screen to see if it would hold up.
YES!
It's is great condition still and could make me a ton more cards.
Step 2: Screen Print Set up
Next step is to click the screen into the screen printing table.
The kit comes with stickers that you can mark the base board so that your paper lines up perfectly every single time.
So take the time to mark the top corner and bottom corner where the paper should lay to line up with the screen print every time.
Step 3: Inking
Now the screen print needs to be lowered so the silk goes down to the table top.
The height can be adjusted so that objects can also be silk screened.
Now raise the screen up off the table a bit and add a row of screen print paint to the top edge of the silk screen--I am using white.
Prime the screen by passing the squeegee through the paint all over the screen a couple of times, while it is not touching the table or paper below.
Then place a piece of cardstock paper on the table right in the registration marked sticker area.
Then lower the screen right on top of it.
Swipe the squeegee over the paint and the screen one time firmly and then lift up the screen.
Repeat this process for a bunch of paper.
Use multiple colors of paper.
If you want to use a different color of ink, remove the screen and wash gently with warm water to remove the paint.
Then dry completely and reattach to the screen printing machine, realign the registration mark stickers and continue screen printing with other colors.
Step 4: Card Making
After the screen printed card fronts are completely dry, they are ready to fashion into cards.
Begin by cutting them into quarters using a paper cutter.
The way I designed this image was so that it could be cut into 4ths easily to make 4 cards that are A2 size.
Cut white cardstock in half, creating 2 pieces that are 8.5 x 5.5.
Then fold those in half.
Next apply double sided tape around the edges of the screen printed card backside.
Then stick the card front onto the folded card blank.
If you are making a bunch of holiday or Christmas cards, you could have a message pre-printed inside the cards as well.
Then the card is complete!
Then repeat the process!
I love having a bright variety of cards ready for a handmade holiday gift, last minute wedding reception, a thank you or a way to slip someone gift cards for a birthday or special occasion.
I repeated the cards using gold ink as well and I totally love the look!
I decided to keep the white and the gold cards separate and gift them in a pack of 4, that way the recipient would get one of each word design.
If you are looking for a fun thing to add to your holiday shopping/ best service line up, doing a holiday card order with extra charges for assembling card packs might be it!
Step 5: Packaging
Final step is to package the cards if you are gifting them.
I love giving people a stack of handmade cards that they can decide how to use through the coming year.
It's a great gift for grandparents too!
So, for packaging, I stack them in piles of 4 cards each, one with each word design.
Then I add a stack of 4 A2 envelopes to the stack and slip them all into a clear cellophane bag, tied with a piece of bakers twine.
I'll add a custom tag to these gifts as well..."wishing you lots of happy occasions to come!" and pass them out to friends and neighbors before the new year.
I love how these screen printed cards turned out!
Did you know that you can silk screen on paper?
It's a great way to make a bunch of something--even your own wedding announcements is totally doable with the xTool Silk Screen Printing Kit!
That's it!
Make your own screen printed holiday or greeting cards using the xTool Screen Printing Kit.
It's easy to design your own cards, screen print right on paper in a variety of ink colors and package them up looking super professional.
Great for Christmas and holiday cards, perfect for giving as friend, teacher and neighbor gifts too--everyone loves handmade cards!
Like, Pin and Save!
-minPIN.jpg)
HOW TO MAKE CUSTOM SCREEN PRINTED T-SHIRTS WITH XTOOL
Learn how to make your own custom t-shirts with xTool screen printing!
Take your own design, image or logo and flawlessly screen print it onto shirts, merch, gear bags, and much more!
This is a great way to make custom merchandise for a business, handmade gifts, family reunion shirts!
Let's get started!
Check out these other crafts made with xTool!
There are so many amazing things this machine is capable of!
How to Engrave Stainless Steel with 2W IR Laser DIY
Turn a love letter signature into a heirloom keepsake!
Learn how to engrave stainless steel pendants with the xTool S1 2W infrared laser.
Think of all the handmade and personalized gifts you can make with this amazing technique!
These are gorgeously engraved permanent marks and will not wipe off...turn your handwriting into a treasure.
How to Laser Engrave Journals DIY with xTool S1
Learn how easy it is to make a laser engraved journal or notebook with xTool laser cutting machine.
Every time I do a laser cutting project it becomes my absolute favorite--and this is no exception, I totally love these faux leather engraved journals!
Engraving on journals is so fast, just minutes, and makes a gorgeous handmade gift, branded business merchandise or custom swag.
Make a Laser Cut Earring Holder DIY with xTool S1
Learn how to make a gorgeous DIY earring display perfect for keeping track of earrings or for displaying earrings for sale at an event!
If you have a big earring collection there are so many wonderful earring stand options--even combining with jewelry organizer solutions too!
How to Make Rubber Stamps with xTool S1 Laser Cutter
Learn how to make your own custom rubber stamps with the xTool S1 Laser cutting and laser engraving machine!
I am absolutely addicted to making rubber stamps now and you will be too--they are super intricate and detailed, I'm in love!
-min.jpg)

-min.jpg)
-min.jpg)
-min.jpg)
-min.jpg)
-min.jpg)
-min.jpg)
-min.jpg)
-min.jpg)
-min.jpg)
-min.jpg)
-min.jpg)
-min.jpg)
-min.jpg)
-min.jpg)
-min.jpg)
-min.jpg)
-min.jpg)
-min.jpg)
-min.jpg)
-min.jpg)
-min.jpg)
-min.jpg)
-min.jpg)
-min.jpg)
-min.jpg)
-min.jpg)
-min.jpg)


-min.jpg)


Comments