

How to Make Three Tier Agate Resin Serving Tray DIY
Make a tiered serving tray for serving at parties, using as a catch all or giving as a gorgeous handmade gift.
This tiered serving tray makes such a statement for a high-class afternoon tea or a quartz-like resin tray for decoration in the dining room.
Just follow this step-by-step tutorial for the perfect crystal resin 3-tier tray!
Previously posted on Resin Crafts Blog

Supplies Needed for Tiered Serving Tray:
affiliate links supply list
- EasyCast Clear Casting Epoxy
- Castin' Craft Translucent Dye in Blue and Green (or your favorite color)
- Silicone Tier Mold and Hardware (no drill or smaller drill bit needed)
- Gold Leaf Flakes
- Glitter
- Disposable Gloves, Mixing Cups, Stirring Sticks, Smaller Cups
- Embossing Heat Gun

Step 1: Mix the EasyCast Resin
Begin by mixing the EasyCast resin in the two phase process.
Be sure to work in a well ventilated room and wear the proper safety protection.
Read the directions from the package before beginning.
As much as I have used resin, I read through it every time.
If there is a problem with resin curing, 9 times out of 10, it's because of improper mixing.
Don't cut corners on this process.

To know how much resin to mix up, fill the molds with water and empty the water into a measuring cup...then you will know the volume of resin to mix.
Mix equal amounts of resin and hardener into a measuring cup and stir gently for 2 full minutes, careful not to whip bubbles into it.
Then pour into a second cup and mix with a second stick for another full minute, being sure to scrape the sides of the mixing container while stirring.

Step 2: Dye the Resin
Then pour the mixed resin into a few smaller cups.
Add a few drops of the translucent color inks into the cups.--decide your color palette well before mixing. I am using blue and green, you can use different colors for each layer or make the tiered trays all matching.
If too much dye is added to the resin, it won't harden properly, so don't over do it.
Just add a drop or 2 at a time until the desired color is achieved...if too much color is added the resin will not cure properly.

Once the colors are mixed, set the silicone molds out on a level work surface.
The custom molds are easy to fill with layers of resin...but should remain level while curing and in a dust or debris free environment.
Placing them inside a box or having a dust cover is helpful if pets are in the home is helpful.

Step 3: Pour the EasyCast Resin
Then pour clear resin in the center of the flexible silicone mold.
Next pour the lightest color of tinted resin around the clear to create a crystal-like resin plate.
Repeat for each of the tiered resin trays.

Then work your way out to the edge with the darkest color.
Use a stir stick to swirl white resin around in circles on the silicone mold--the white is more of an opaque color than the blue.
Use a small heat gun to spread the color around on the resin layer a little.

Step 4: Add Sparkle to the Resin
Now add some gold leaf flakes into the resin to give it a unique look - let the resin sit for just a minute or 2 before adding embellishments.
I used gold leaf, and I broke it up into flakes and added it...but you could add additional elements like glitter or mica powder dusted over the top of the first layer of resin.

Then swirl some gold glitter or extra pieces of gold leaf in the resin...gives it an elegant style.
You could add other little things, like pressed flowers for a floral composition or sprinkles or candy too!

Set the 3-tier biscuit mold set aside overnight to cure and harden.
No need to do a second layer of resin, as the first layer filled the molds completely.

Step 5: Demolding
After 24-48 hours, peel the mold off the resin, beginning with the edges of the mold.
This is such a satisfying part--a truly delighted moment!
Notice how the heavier colors, like the white, sunk to the bottom of the diy resin tray?
The white and the glitter dance around in a delicate balance as the resin hardens.

The base is set, so the way you pour it is the way the base will show...this is due to the screw hardware.
The other 2 tiers are flexible and can be turned over either way.
Do you like this resin surface with the heavier amounts of white showing?

Or this one?

Step 6: Hardware and Assembly
Now add the hardware to make the tiered serving tray complete. No full set of diy tools needed, these pieces just twist in place with your hands.
3-tier tray molds are easy to use over and over, just buy more hardware and make matching serving trays for a wedding or special event.

Assembling the tray components, start by laying them all out in order so you know exactly which piece goes where, then there is no untwisting necessary.
Begin by putting the short screw in the bottom resin tray, the largest tier.
Then add a flexible washer, the next of the tier sticks, flexible washer (or plastic nut) and then the middle tier.
Next, add a flexible washer, the next hardware stem, flexible washer and the top tier.
Finally add a flexible washer and the top hardware stem with the loop on top.
Twist the pieces together firmly but do not over tighten.

The best part about this tiered serving tray is that it can be taken apart for cleaning, storage or gifting!
This gorgeous tiered serving tray made from resin is the perfect handmade gift, princess dream party or statement piece.
Great for organizing beautiful skin care products on the vanity, or filled with delightful sweets for special events.

If mixed correctly the resin is food safe and waterproof material, so no worries about serving at a dinner party or tea party.
Still having the desserts in a cupcake liner is always more sanitary--cupcake papers filled with treats is the perfect option.

That's it!
Create this beautiful tiered tray with your resin DIY skill!
Perfect essential prop for a fancy party, for displayed objects on the counter or table, an absolutely elegant fruit tray or for an antique store vibe!
Make a resin tiered serving tray today!
Like, Pin and Save!

Here's a bunch of other awesome resin crafts how-to tutorials!
Mosaic Cake Stand
Resin crafting is awesome, there are so many different applications for resin.
Here's a fun cakestand that makes a great resin project for a beginner, without looking like a beginner project! Great for a cake mix cake or just decor!
Upcycle an old cake stand with a glass mosaic finished with high gloss resin to give it new life.

Glitter Light Switch Plate!
How to make a glittery light switch plate cover using glitter and resin!
Customize the color of glitter and top it off with High Gloss Resin for a smooth and shiny finish.
It’s a simple DIY craft (and hack light light) that just takes a few minutes of work time and overnight drying.

Skeleton Key Necklace
How to Cast Skeleton Key in Clear Resin Skeleton keys are my favorite, they remind me of secret doors.
Create an amazing skeleton key necklace with resin for an especially fun steampunk flare accessory.
This project takes just a few supplies and a little time.

Resin Glitter Hairclips
Make gold and sparkly hair clips with jewelry resin to match an outfit or for a handmade gift.
This unique resin craft takes just a few supplies and about 10 minutes of working time, then overnight to dry.
These cute clips should be made in every color, perfect for every outfit or dress in the closet.
One can never have too many hair clips!

Faux Jade Stick Barrettes
How to Make a Faux Jade Resin Stick Barrette!
Learn how to make a faux jade stick barrette.
It's a breeze using Easy Sculpt epoxy clay and scrap tooling leather. Perfect for totally chic hairstyles!

Pineapple Canvas with High Gloss Resin
Pineapple Painted Canvas with High Gloss Resin is a simple project.
Best part, paint whatever you like on a canvas and then coat it in art resins for gorgeous shine!

Paperclip Bookmarks
Make a darling bookmark with a paperclip and some regal resin shapes painted with metallic paints.
This is a perfect craft for a book club, quick gift or for fun.
Create the perfect paperclip bookmark with small amounts of FastCast resin, metallic paint and a little twine.

Resin Monster Eyes
Resin Monster Eyes Perfect for Costumes Cosplay DIY!
This type of resin can be colored with acrylic paint for an opaque finish!

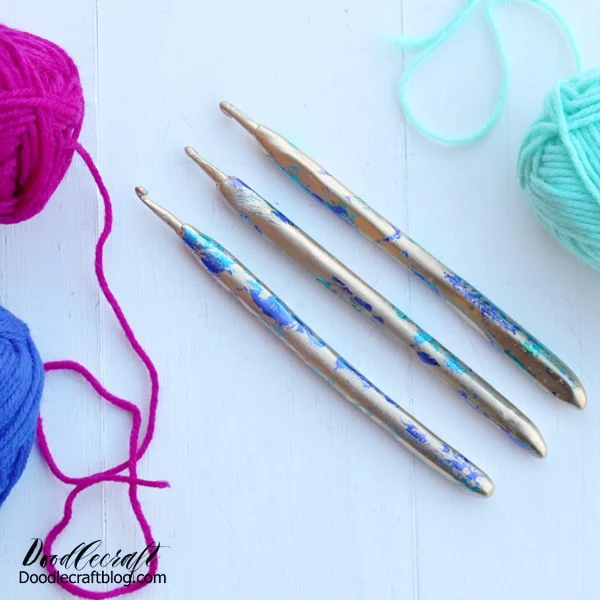
Metallic Leaf Crochet Hooks
Do you crochet or know someone that does?
Crochet hooks are not especially comfortable and this craft makes them more comfy to use–plus more fashionable!
These hooks will make a uniquely great gift for a yarn crafter.
Gold Leaf Necklaces
How to make gold leaf necklaces with bezels and jewelry resin clay!
This type of resin is not in liquid form, it's a clay that you mix 2 parts together to trigger the chemical reaction!
It's a simple project and looks awesome!

Resin Pine Needle Coasters
Pine needle coasters are easy to make with EasyCast Resin and a small branch from your Christmas tree.
Make a resin coaster each year to memorialize your holidays spent together.
Make some of these coasters now...or save this idea for the holidays!

Resin Wood Slice Ornaments
Wood slice ornaments are perfect to give as neighbor gifts or to deck the tree with matching handmade ornaments.
Make stunning wood slice ornaments using high gloss resin and the dirty pour technique.
Resin pouring is a highly addictive craft, let’s get started!

Faux Butterfly Wing Earrings
How to make faux butterfly wing earrings with high gloss resin!

Upcycled EasySculpt Make-up Brushes

Metallic Leaf Serving Tray
How to make a metallic leaf serving tray with high gloss resin!
Just a thin layer of table top resin makes this tray an awesome open concept art piece.


-min.jpg)


Comments