
-min.jpg "How to Make Bible Bookmarks with Qfun Laminator")
How to Make Bible Bookmarks with Qfun Laminator
Learn how to make fun bible verse bookmarks using the Qfun Laminator.
You can make any of your favorite bible verses into a bookmark to keep track of you reading in any book.
Bookmarks are such a fun craft and are easy to make, let's get started!
-min.jpg "How to Make Bible Bookmarks with Qfun Laminator")
13 INCH THERMAL LAMINATOR
First off, if you don't have a laminator, they are so much fun!
I would have loved a laminator when I was little, instead I used clear contact paper that my mom had and would laminate all kinds of little art things I drew and colored.
Qfun sent me this beautiful laminator and it's 13 inches wide, which means it can laminate posters and prints that I make!

SUPPLIES NEEDED FOR BIBLE VERSE BOOKMARKS:
- THERMAL LAMINATOR (comes with tools too--paper cutter, hole punch, corner rounder and more!)
- Thermal Lamination Pouches (30 different sizes are included with the QFun laminator)
- Watercolor Paper
- Water Based Markers
- Fudenosuke Brush Pen
- Bookmark Tassels
- 1/8 Hole Punch (hole punch comes inside the Qfun laminator)
- Paper Cutter or Scissors (paper cutter comes inside the Qfun laminator)
-min.jpg "How to Make Bible Bookmarks with Qfun Laminator")
Step 1: Watercolor Wash on Watercolor Paper
Begin by doing a simple watercolor wash on watercolor paper with the edges of the paper taped down to a firm surface, like a table or a board.
I've got a tutorial on PAINTING A WATERCOLOR WASH here.
Or a post on WATERCOLOR WASH WITH MARKERS here.
Follow those tutorials or use some scrapbook paper as your background and meet me back here.
-min.jpg "How to Make Bible Bookmarks with Qfun Laminator")
Step 2: Scripture Verse
Now that you have a background paper ready, you need to pick a scripture or quote that you love...pick from either the new or old testament.
Write them on the watercolor background paper in hand lettering or just in your own hand writing.
Here's some good choices:
- My sheep hear my voice...and they follow me. --John 10:27
- I will be glad in the Lord. --Psalm 104:34
- Let us love one another for love is of God. --1 John 4:7
-min.jpg "How to Make Bible Bookmarks with Qfun Laminator")
Step 3: Trim Bookmarks
Use the paper cutter to trim down the watercolor paper to the perfect size for a bookmark.
I am doing 2.5x5 inches.
NOTE: If I was doing this with a bible study class or Vacation Bible School or Summer Camp, I would trim the paper down before writing on them, so the artists could fill the paper without having to cut any of it off later.
-min.jpg "How to Make Bible Bookmarks with Qfun Laminator")
If you don't have a paper cutter, you can use a straight edge and pencil to mark a line and cut the edges with scissors.
Make as many bookmarks as you want, they are such a cost effective budget friendly craft.
I love paper crafts for this reason.
-min.jpg "How to Make Bible Bookmarks with Qfun Laminator")
Step 4: Laminating Time
I love using this Qfun laminator.
It heats up in just one minute, so no need to plug it in hours before to make sure it's hot enough.
It's super space efficient for the size it can laminate, and the top of the laminator opens up and has tools inside--even a paper cutter and a hole punch!
-min.jpg "How to Make Bible Bookmarks with Qfun Laminator")
Place the paper inside a laminating pouch, set the laminator to "heat" rather than a cold lamination.
-min.jpg "How to Make Bible Bookmarks with Qfun Laminator")
Then insert the lamination pouch into the laminator with the folded/crease edge in first.
-min.jpg "How to Make Bible Bookmarks with Qfun Laminator")
It laminates fast and does a fantastic job!
-min.jpg "How to Make Bible Bookmarks with Qfun Laminator")
Step 5: Trim up Bookmarks
Now, if you don't have a paper cutter that you love, the Qfun laminator has one right inside the top. Just lift the lid of the laminator for a paper cutter, hole punch and corner rounder...everything you need for this craft in one machine!
Trim up the excess lamination from around the bookmarks, I like to leave about 1/8th inch around all the edges of the paper.
-min.jpg "How to Make Bible Bookmarks with Qfun Laminator")
Now use the included corner rounder and round off the corners of the lamination for a professional and smoother finish.
-min.jpg "How to Make Bible Bookmarks with Qfun Laminator")
Step 6: Bookmark Tassel
Now mark at the top of the bookmark the half way point with a dot.
-min.jpg "How to Make Bible Bookmarks with Qfun Laminator")
Then use the included hole punch from the Qfun laminator, or if you have your own 1/8th inch hole punch, punch a hole where you marked the dot, close to the top edge, but not too close that it will tear easily.
-min.jpg "How to Make Bible Bookmarks with Qfun Laminator")
Finally, loop a bookmark tassel through the hole and around itself, pulling it into a larks head or girth hitch on the bookmark.
-min.jpg "How to Make Bible Bookmarks with Qfun Laminator")
Then repeat for all the bookmarks you are making, adding different colored tassels to each one.
These little tassels are so much fun, I remember loving them when I was little and loving marking my place with them.
This fun tutorial is all about bible verse bookmarks, but this same technique works perfectly for any paper bookmark, just get creative and have fun!
That's it!
It's easy to make Bible Verse Bookmarks with the Qfun laminator!
Laminating is a great way to preserve paper and make it a little more durable.
Bookmarks are a fun craft, super cost effective and make great Summer camp crafts.
Like, Pin and Save!
-min.jpg "How to Make Bible Bookmarks with Qfun Laminator")
Here's a bunch of other bookmarks you are sure to love too!
How to Make Pressed Flower Laminated Bookmarks DIY
Preserve gorgeous pressed flowers in lamination for the perfect and easy bookmark!
These flowers and four leaf clovers were found in my yard and perfect for an epic book place holder, and super lucky too.
Just a few simple supplies needed to make gorgeous floral bookmarks!
-min.jpg "Preserve gorgeous pressed flowers in lamination for the perfect and easy bookmark! These flowers and four leaf clovers were found in my yard and perfect for an epic book place holder. Just a few supplies needed to make all the flower art bookmarks!")
How to Make Watercolor Bookmarks (Beginners Tutorial)
Learn how to paint watercolor bookmarks easily for the the perfect diy bookmark.
These make a great gift in addition to a pile of favorite novels!
Let me show you how to create these awesome watercolor effects effortlessly!
-min.jpg)
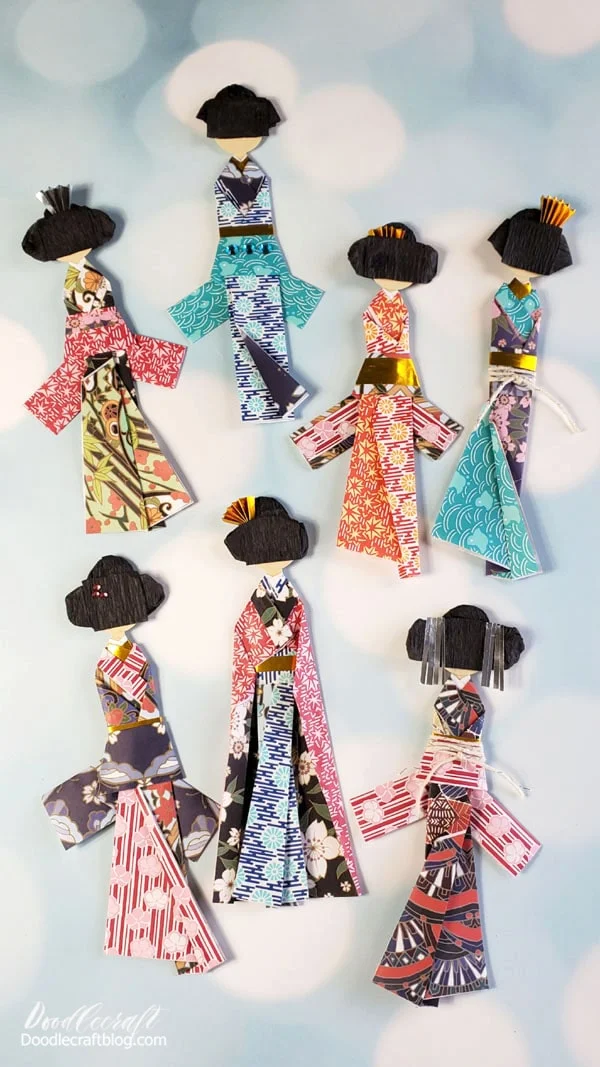
Japanese Paper Doll Bookmarks
Learn how to make Japanese Paper Dolls with origami paper.
It's not an origami bookmark (paper folding with no glue), but use the vibrant shades and different colors of origami paper to capture the traditional origami vibe...as a paper doll--that makes the perfect bookmark!
-min.jpg)
Butterfly Bookmark DIY
Learn how to make a folded butterfly, heart or flower bookmarks using a few simple supplies.
Attention book lovers, make the perfect bookmark for keeping track of your page as well as looking beautiful for Spring!
-min.jpg)
How to Make Origami Corner Bookmarks (Easy Paper DIY)
Origami paper corner bookmarks are super easy to make and perfect for teaching a large group.
Just a few easy steps and folding to make a little DIY origami corner bookmark to keep track of reading all during the school year.
These easy corner bookmarks are a perfect gift, easy crafts for a school class or youth group, and all you need are some squares of paper.
-min.jpg "How to Make Origami Corner Bookmarks")
Make an Engraved Bookmark with xTool!
Learn how easy it is to make an engraved wood bookmark with the xTool M1 laser cutting machine.
This fun engraved bookmark--different projects great for older kids--would make a great handmade gift, decoration piece or used as a gift tag!
The visual appeal of engraved wood has endless possibilities.
This would make a great Father's day gift too--for a man that loves a fabulous reading experience.
-min.jpg)
How to Make Ginkgo Leaves Bookmark Gingko Leaf Crafts
Learn how to make Ginkgo leaves bookmark using actual leaves.
This is a fun nature craft that works with the leaves used on gel plate ginkgo leaf prints, with a subtle amount of gold acrylic paint on each leaf surface.
Let's get started creating these natural and earthly bookmarks!
-min.jpg "How to Make Ginkgo Leaves Bookmark Gingko Leaf Crafts")
How to Create Bookmarks with Gel Plate Printing DIY
Learn how to create beautiful bookmarks with gelli printing art monoprints!
Mono printing with a gel plate or gelli plate is so much fun, and transforming your gorgeous unique pieces and prints into laminated bookmarks is a quick and easy craft.
Let's get started creating these gorgeous ginkgo leaf printed bookmarks!
-min.jpg)


-min.jpg)


Comments