
-min.jpg "How to Make Handwritten Heart Sign xTool Acrylic DIY")
How to Make Handwritten Heart Sign xTool Acrylic DIY
Learn how to take handwritten hearts and cut them out of acrylic to make the perfect Mother's Day gift.
xTool has done it again, with black core gold acrylic that can be cut easily on the xTool S1.
It's easy to make something beautiful and custom for your home in just a few minutes with the xTool S1.
Let's get started!
-min.jpg "How to Make Handwritten Heart Sign xTool Acrylic DIY")
XTOOL S1 CAN CUT METALLIC GOLD ACRYLIC!
The gold shimmery acrylic used to only be able to be cut with a CO2 Laser, but xTool has created colored acrylics with a black core, so they are easily and beautifully cut with a Diode or Blue Light Laser.
This is a huge game changer for us diode laser users, because now we can cut shiny metallic gold for the perfect, classy gift.
Do not buy the acrylic sheets from Hobby Lobby unless you have a CO2 laser, they will not cut with a diode laser.
CHECK OUT ALL THE COLORED ACRYLICS WITH A BLACK CORE HERE!
-min.jpg "How to Make Handwritten Heart Sign xTool Acrylic DIY")
MAKE PNG FILES OF EVERYONE'S HEART:
This fun craft gets the whole family involved!
Begin by having everyone in the family...or all the kids...or all the grandkids draw a heart.
It can be as simple or as complicated as they want, the uniqueness is seeing everyone's individual style, you can even add handwriting notes or quotes.
I had my family draw their hearts on my ipad, so they were already digitized and easy to upload into xTool Creative Space.
If you have them draw on paper, simply scan or take a picture as straight on as possible and upload those pictures.
Remove backgrounds, save as a PNG file for the BEST results.
Then load them into XCS.
-min.jpg "How to Make Handwritten Heart Sign xTool Acrylic DIY")
SUPPLIES NEEDED FOR HANDWRITTEN HEART SIGN:
- xTool S1 20W (or similar laser cutting machine)
- Gold with Black Core Acrylic Sheet
- Bearly Art Precision Craft Glue
- Hearts, Drawn by Every Member of the Family
- Wood Sign (I found mine at Dollar Tree, but it was years ago)
-min.jpg "How to Make Handwritten Heart Sign xTool Acrylic DIY")
STEP 1: MEASURE, SIZE AND CUT ACRYLIC
Begin by measuring your wood sign or piece of wood that you will mount the acrylic hearts to.
The number of hearts makes a difference for the size and amount of hearts to add to it.
I have 5 people in my family (myself included) and this board was about 15 inches wide and fit perfectly.
You can make small hearts to fit a smaller board to, so just upload your heart images and size them to fit the board you will mount them to.
Once they are the correct size, scrunch them all as close together as possible to make maximum use of your acrylic board.
Then cut the acrylic on the BLACK 3MM ACRYLIC settings. 100 power, 8 speed is what I did.
%20copy-min.jpg "How to Make Handwritten Heart Sign xTool Acrylic DIY")
The acrylic cut beautifully and all 5 hearts were cut out in less than 5 minutes, only one pass needed.
Open up the xTool S1 and remove the little pieces of the hearts.
-min.jpg "How to Make Handwritten Heart Sign xTool Acrylic DIY")
STEP 2: ADHERE TO WOOD
Now that the acrylic is cut, remove the paper backing on the black side.
Then arrange the hearts on the piece of wood so they fit evenly and the top of the heart is placed where you want.
If you want your wood sign to have a distressed look, Mod Podge fabric or scrapbook paper on it, or even painted a different color, do it now before gluing the hearts to it.
%20copy-min.jpg "How to Make Handwritten Heart Sign xTool Acrylic DIY")
Then use the Bearly Art Precision Craft Glue to run a small bead all over the back of the acrylic and glue it to the wood board.
I started with the end heart, but if I did this a second time, I would start with the middle heart and glue out from there, ending with the side piece.
%20copy-min.jpg "How to Make Handwritten Heart Sign xTool Acrylic DIY")
I do not recommend hot glue for this project, it is too hard to control, gets strings everywhere and the acrylic will pop off in no time at all.
If you are making this out of bass wood heart cutouts, then hot glue would work, but I still ABSOLUTELY recommend Bearly Art, it's totally worth it's price!
-min.jpg "How to Make Handwritten Heart Sign xTool Acrylic DIY")
Place some books on top of the acrylic to hold them down firmly as the glue dries.
Give it just about 10 minutes to dry and 24 hours to cure.
-min.jpg "How to Make Handwritten Heart Sign xTool Acrylic DIY")
You could absolutely add a handwritten quote under the hearts for extra special gifts.
This cute love sign just makes me happy...especially now that my daughter lives clear across the country from me.
I just asked her to draw a heart and send it to me.
I love how this turned out, it's a perfect Mother's day, Valentine's day or birthday gift!
Can you tell which hand written heart is mine?
-min.jpg "How to Make Handwritten Heart Sign xTool Acrylic DIY")
I'll give you a hint:
My heart is the tall skinny one.
This fun DIY project too less than one business day...seriously if you have the supplies on hand it takes less than an hour to upload, cut, glue and enjoy!
Perfect last minute gift idea!
-min.jpg "How to Make Handwritten Heart Sign xTool Acrylic DIY")
I love my xTool S1 Laser Cutter, I can do so many amazing high-end crafts, home decor pieces, thoughtful gifts and customizations.
It totally ups my crafting game with the range of options I have.
If you are considering a laser cutter, check out this post.
-min.jpg "How to Make Handwritten Heart Sign xTool Acrylic DIY")
That's it!
Make a thoughtful and beautiful handwritten heart sign with gold acrylic and the xTool S1.
This easy and quick DIY project is customized with the whole family, kids or grandkids love and makes the perfect Mother's Day or Valentine’s day gift.
In less than an hour you can create this made with love heart sign, and take custom orders to make your friends and family one too!
Like, Pin and Save!
-minPIN.jpg "How to Make Handwritten Heart Sign xTool Acrylic DIY")
CHECK OUT THESE OTHER AMAZING XTOOL CRAFTS TOO:
How to Make Wood Bouquet Flowers xTool Spring DIY
Finish off National Craft Month with xTool making the perfect wood bouquet of flowers for Spring.
I love how these delicate and detailed flowers turned out and especially love that I'm not allergic to them.
Decorate your home, DIY a wedding or make a handmade gift easily and quick with xTool S1.
-min.jpg "How to Make Wood Bouquet Flowers xTool Spring DIY")
Hello Spring Sign
Welcome Spring with the perfect sign!
This darling sign is mostly sourced from amazing products bought at the dollar store with a little laser cut hello on the front.
This could be adapted to any word, or even a phrase like "hello Spring" or "welcome baby".
-min.jpg)
Laser Cut Ornate Frame
This laser cut ornate frame is 6 layers of gorgeous intricate cuts!
This frame was actually cut without air assist--back before I had it.
I love how it turned out--I got this file in a super cheap bundle, and I'm so happy about it. It came with about 10 other designs and I need to make them all.
It even has a display stand that notches in to the back of the layered frame!
I am such a lover of natural wood finish, so no paint is necessary for me.
What do you think? Would you paint it? It would look stunning in gold!
-min.jpg "How to Make a Laser Cut Ornate Frame! I just want to make beautiful things, even if nobody cares! Learn how easy it is to make a beautiful ornate frame with the xTool M1 Laser Cutting Machine. I have been loving my xTool M1 laser cutting machine that was gifted to me. It's opened up a whole new world of crafting to me. I love it! Read more about it here: xTool M1 10W Deluxe RA2 Pro")
Disco Ball Plant Pick
This is the perfect little laser cut "I will survive" disco ball plant stake! (my husband thought it was the death star...lol)
I need to make more plant adornments for all my other plants now too!
It's easy to engrave and cut with the xTool.
The software is smart, it does all the outlining, then engraving and finishes off with the cutting, so the print turns out perfectly every time!
This specific item ends up soaking up the moisture in the planter and does not last forever.
-min.jpg "This is the perfect little I will survive disco ball plant stake! I need to make more plant adornments for all my other plants now too! Do you have plants? This is the first time I've tried houseplants. I've had bamboo and succulents, which I manage to kill somehow or another. But to actually have a plant feels a little like having a toddler...I check on it all the time, move it around the house and pray for it. Please let me know all your best houseplant tips!")
Wood Burned Engraved Florals:
First, let's talk about the FolkArt Watercolor Gelz.
They are awesome acrylic paints in more of a gel consistency than other acrylic craft paint--works almost like a wood stain--I love being able to see the wood grains under the colors.
You don't have to water them down, but I like to add water and paint just like watercolors.
They come in a huge array of beautiful and vivid colors--I'm using 14 different colors in the one engraved wood plaque.
They are perfect to use in connection with the xTool M1 Laser Cutting Machine.
This image was a single file I bought on etsy and then repeated over and over to make a stunning bouquet of flowers to be engraved in the plywood.
-min.jpg)
Sunset Mountain Mandala
This mountain sunset mandala art is the perfect Summer craft!
It's got all the late night/camping/sunset in the mountains vibes--it's layered on a piece of pallet signage and then the delicately laser cut mandala is glued on top. I love the vibrant colors peeking through!
I'm a beach girl in my mind, but my budget and location make me a mountain girl.
Learn How to Make a Mountain Sunset Mandala Wood Pallet!
-min.jpg "How to Make a Mountain Sunset Mandala This mountain sunset mandala art is the perfect Summer craft! It's got all the late night/camping/sunset in the mountains vibes. I'm a beach girl in my mind, but my budget and location make me a mountain girl. Let's make this gorgeous wall art piece in just a few minutes! Learn How to Make a Mountain Sunset Mandala Wood Pallet!")
How to Make Nursery Name Sign (Custom DIY with xTool)
Learn how to make a gorgeous nursery name sign for a new bundle of joy!
Make a name sign for any occasion, not just a new baby...change the text for a wedding, family name or with a fun saying.
This wood sign is perfect for customizing with a first and middle name, and looks great as home decor.
-min.jpg "How to Make Nursery Name Sign (Custom DIY with xTool)")
How to Engrave Stainless Steel with 2W IR Laser DIY
Turn a love letter signature into a heirloom keepsake!
Learn how to engrave stainless steel pendants with the xTool S1 2W infrared laser.
Think of all the handmade and personalized gifts you can make with this amazing technique!
These are gorgeously engraved permanent marks and will not wipe off...turn your handwriting into a treasure.
-min.jpg)
How to Laser Engrave Journals DIY with xTool S1
Learn how easy it is to make a laser engraved journal or notebook with xTool laser cutting machine.
Every time I do a laser cutting project it becomes my absolute favorite--and this is no exception, I totally love these faux leather engraved journals!
Engraving on journals is so fast, just minutes, and makes a gorgeous handmade gift, branded business merchandise or custom swag.
-min.jpg "Supplies Needed for Laser Engrave Journals: affiliate links: OtterBlotter Hardcover Lined Journal Notebook xTool S1 diode laser (or other laser engraving machine) xTool Creative Space Image to engrave")
Make a Laser Cut Earring Holder DIY with xTool S1
Learn how to make a gorgeous DIY earring display perfect for keeping track of earrings or for displaying earrings for sale at an event!
If you have a big earring collection there are so many wonderful earring stand options--even combining with jewelry organizer solutions too!
-min.jpg "Learn how to make a gorgeous DIY earring display perfect for keeping track of earrings or for displaying earrings for sale at an event!")
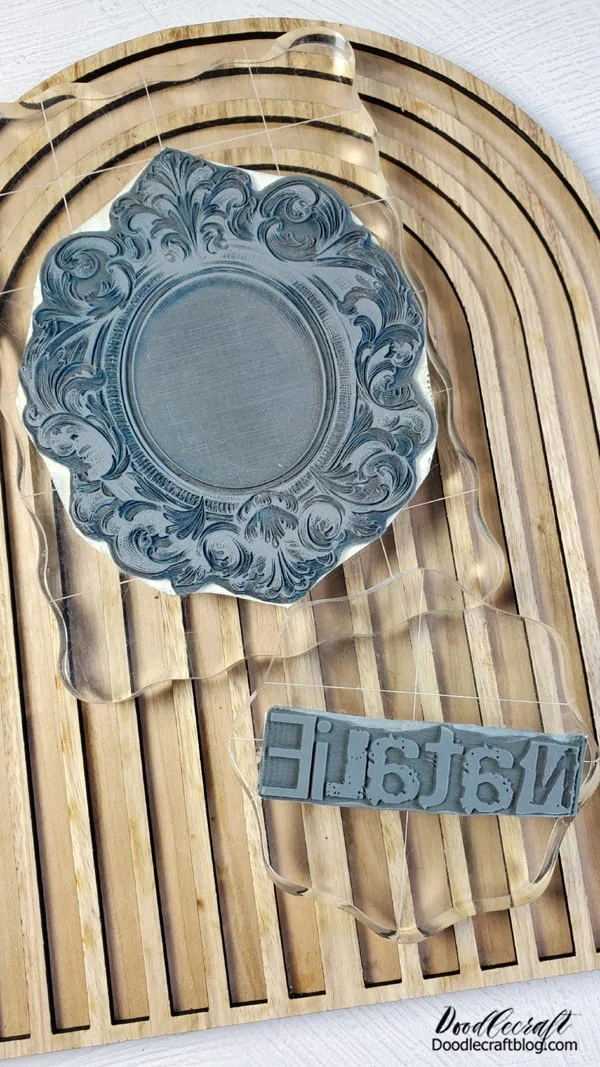
How to Make Rubber Stamps with xTool S1 Laser Cutter
Learn how to make your own custom rubber stamps with the xTool S1 Laser cutting and laser engraving machine!
I am absolutely addicted to making rubber stamps now and you will be too--they are super intricate and detailed, I'm in love!
-min.jpg)
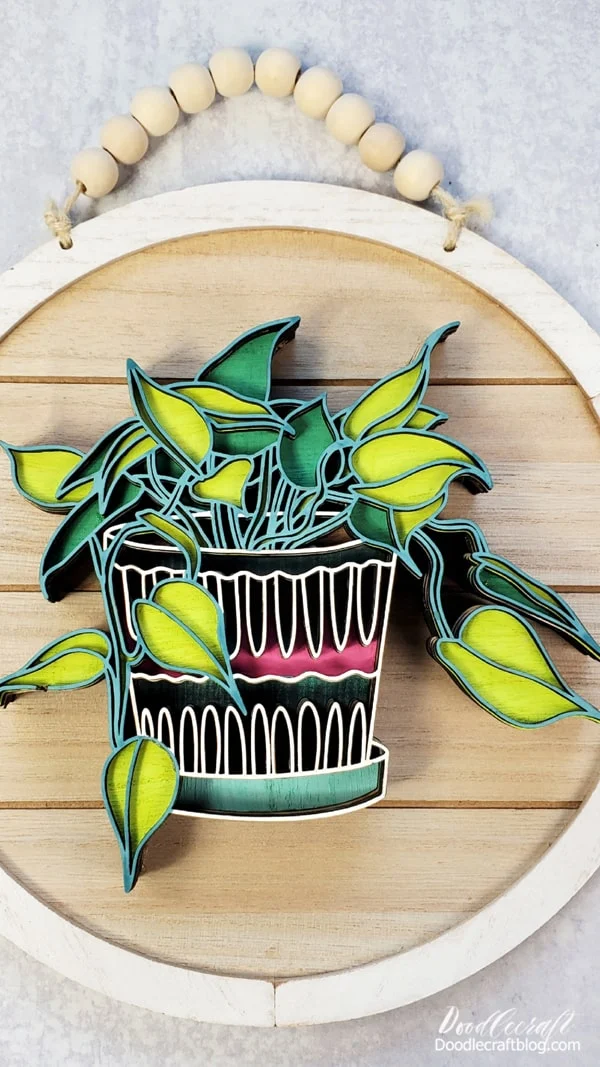
Layered Laser Cut Wood Sign with Tooli-Art Paint Pens
Layered laser cut wood signs are beautiful, fun to make, and totally the thing right now!
The intricate cuts of a laser cutter make it possible to stack very delicate layers into a work of art easily and making it not quite so delicate.
The depth, texture and colors make this little planter sign so intriguing!
-min.jpg "Layered Laser Cut Wood Sign with Tooli-Art Paint Pens")
Learn how to make stunning leather bracelets with the xTool Laser Cutting machine.
It's easy to make laser cut leather bracelet and makes a meaningful gift for a special occasion!
These wrap-around wrist bracelets are easy to make and secure with a stud rivet...they are adjustable in size, can be customized and only take 3 supplies!
-min.jpg "Learn how to make stunning leather bracelets with the xTool Laser Cutting machine. It's easy to make laser cut leather bracelet and makes a meaningful gift for a special occasion! These wrap-around wrist bracelets are easy to make and secure with a stud rivet...they are adjustable in size, can be customized and only take 3 supplies!")
DIY Laser Engraving a Mirror with xTool S1 20W Diode
Engrave a mirror with the xTool S1 Laser Cutting machine for a gorgeous statement piece of home decor.
Add an inspirational message or family motto on a mirror with glass laser engraving!
The possibilities with the xTool electronic products are endless!
-min.jpg "Add an inspirational message or family motto on a mirror with glass laser engraving!")
Harry Potter Deathly Hallows Wedding Cake Topper DIY
If you are planning a Harry Potter themed wedding, event, birthday party or special occasions, this Deathly Hallows cake topper is the icing on the cake.
I'm sharing these 2 different cake toppers, free downloads at the end of the post, as an inexpensive way to do cake decorations with a high quality professional look.
-min.jpg "Here's the second: Always deathly hallows topper with peonies on the side.")
Acrylic Monstera Leaf Earrings
Cut acrylic with a diode laser and make earrings!
Diode lasers can cut cast acrylic in specific colors...not clear, white or blues.
Black acrylic cuts best--so smooth and dreamy!
-min.jpg)
Beauty Leather Bracelet
Learn how to make an engraved leather bracelet with the xTool M1 Laser Cutting Machine.
This stunning bracelet is the perfect custom gift to make for Mother's day, and took less than 5 minutes from start to finish!
-min.jpg)


-min.jpg)


Comments